16. Configuration » Servers
Any server running a Wanguard software component has to be manually defined in Configuration » Servers, except for the Console server, which is automatically added during installation.
To add a new server, click the [+] button from the title bar of the Configuration » Servers panel. To modify an existing server’s configuration, go to Configuration » Servers and click its name. The on/off switch next to each server in that list decides whether the Console keeps reporting on the server while it is offline, and it asks for confirmation before switching.
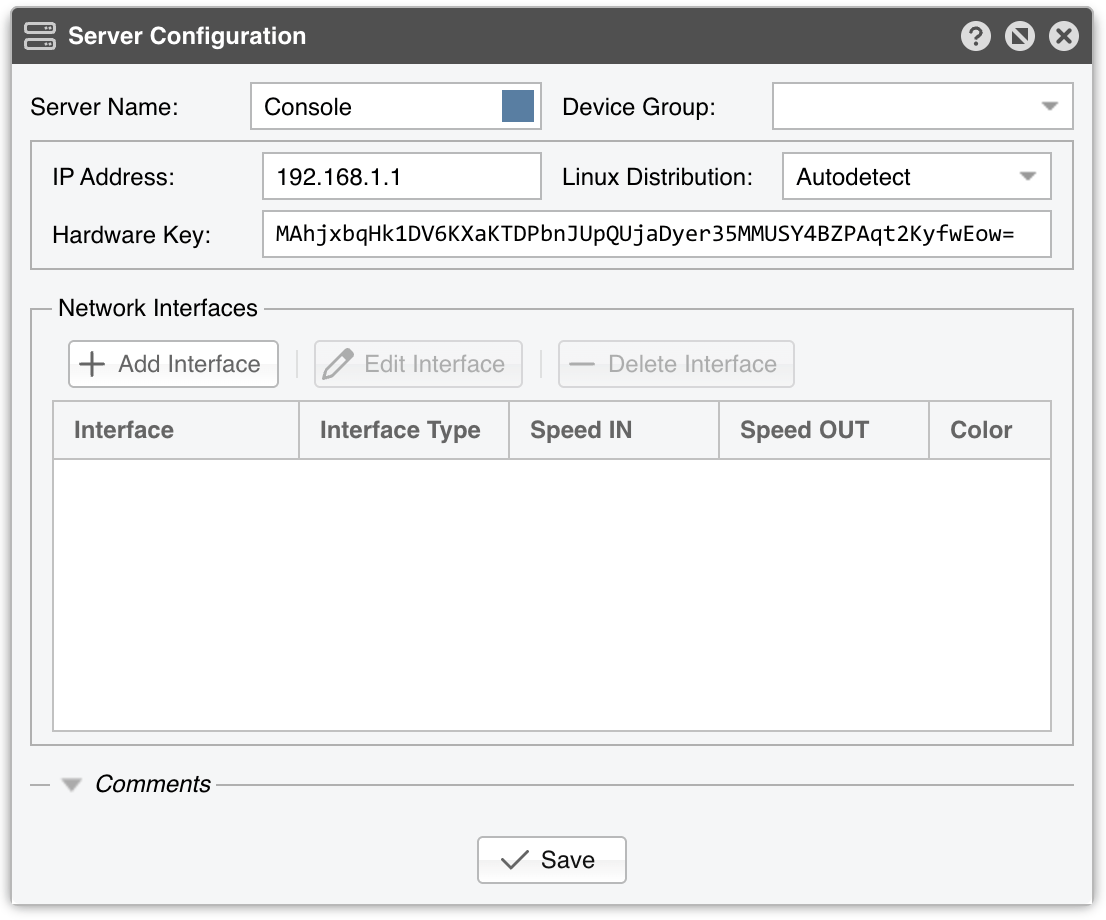
Server Configuration parameters:
● Server Name – A short name to help you identify the server. It cannot be left empty● Server Color – The color used in graphs for this server, chosen from the colored square inside the Server Name field. The default color is a random one● Device Group – Optional description used to group servers by location, role, etc. The combo box is editable, so you can type a group that does not exist yet● IP Address – An IP address that is defined on the server and is unique within your network. It can be public or private, IPv4 or IPv6, but it cannot be a loopback address (127.0.0.1). Enter an IP address that doesn’t change, to prevent licensing issues● Linux Distribution – Leave it on Autodetect, or name the distribution installed on the server: CentOS 7 or 8, RHEL 8 to 10, Debian 8 to 13, or Ubuntu 14 to 26● Hardware Key – A read-only string used for licensing. The WANsupervisor service updates this field when the hardware, IP, active NIC, or hostname changes. If the hardware key is unregistered, send it to <sales@andrisoft.com>.● Network Interfaces – The WANsupervisor service monitors packets/s, bits/s, errors, and dropped frames for each server interface added manually into this grid. The graphs are available in Reports » Servers » [Server] » Server Graphs » Data Units = Server Interfaces. These stats are provided by the Linux kernel● Comments – A collapsed section at the bottom of the window. These observations are not visible elsewhere
Manage the interfaces with [Add Interface], [Edit Interface], and [Delete Interface]; double-clicking a row opens it for editing as well. Each one carries an Interface Name with the color it uses in graphs, an Interface Type — Auto, Physical, Bond / LAG, VLAN, Bridge, Virtual, Loopback, or Other — and its Link Speed IN and Link Speed OUT. The grid lists all of them side by side.
[Save] stores the configuration, and the first time you save a new server it reminds you to start the WANsupervisor daemon on it. [Delete] removes the server after asking for confirmation; it is absent for the Console server, which cannot be deleted.
16.1. Server Troubleshooting
[root@localhost ~]# ntpq -p || chronyc tracking || timedatectl status
[root@localhost ~]# /opt/andrisoft/bin/WANmaintenance repair_db
16.2. Distributing Sensors and Filters
To distribute Sensors or Filters over multiple servers for load balancing, geographical distribution, high availability, or redundancy:
1. Add the new server in Console, under Configuration » Servers, and enter a Server Name and a non-loopback IP address2. Install the software on the new server by following the installation instructions from the link contained in the evaluation request’s response email3. When executing /opt/andrisoft/bin/install_supervisor, enter the IP of the Console server and the Console database password4. Start the WANsupervisor service on the new server5. Make sure that NTP is running on the server and that the status is OK in Reports » Devices » Overview6. During the trial period, you do not need to register any server. Once the trial ends, register the server’s hardware key (visible in Configuration » Servers » [New Server]) after starting WANsupervisor. To register new hardware, email <sales@andrisoft.com>.7. Define a new Sensor or Filter and set the Server parameter accordingly8. Start the new Sensor or Filter from Configuration » Components9. Watch the event log to see if there are any errors or warnings10. Follow the instructions from NFS configuration steps
16.3. Accessing Remote Data via NFS
Install the necessary packages on the Console server:
[root@console ~]# apt-get install nfs-common
Install the necessary packages on the remote server:
[root@remote ~]# apt-get install nfs-kernel-server nfs-common
Find the Server ID of the remote server by executing
/opt/andrisoft/bin/WANmaintenance show_serverson the Console server. You will replace [server_id] with this number in the following steps.Find the UID and GID of the
andrisoftuser account on the Console server by executing:
[root@console ~]# id andrisoft
uid=4097(andrisoft) gid=4097(andrisoft) groups=4097(andrisoft)
In this particular case, in the next step you should replace [andrisoft_uid] with 4097 and [andrisoft_gid] with 4097.
On the remote server, add the following lines to the /etc/exports file:
/opt/andrisoft/dumps/[server_id] [console_ip](no_subtree_check,rw,anonuid=[andrisoft_uid],anongid=[andrisoft_gid])
/opt/andrisoft/flows/[server_id] [console_ip](no_subtree_check,rw,anonuid=[andrisoft_uid],anongid=[andrisoft_gid])
Execute on the remote server:
[root@remote ~]# mkdir -p /opt/andrisoft/dumps/[server_id]
[root@remote ~]# chown -R andrisoft:andrisoft /opt/andrisoft/dumps/[server_id]
[root@remote ~]# mkdir -p /opt/andrisoft/flows/[server_id]
[root@remote ~]# chown -R andrisoft:andrisoft /opt/andrisoft/flows/[server_id]
On the Console server, add the following lines to the /etc/fstab file:
[sensor_ip]:/opt/andrisoft/dumps/[server_id] /opt/andrisoft/dumps/[server_id]  nfs  soft,bg,_netdev
[sensor_ip]:/opt/andrisoft/flows/[server_id] /opt/andrisoft/flows/[server_id]  nfs  soft,bg,_netdev
Execute on the Console server:
[root@console ~]# mkdir -p /opt/andrisoft/dumps/[server_id]
[root@console ~]# chown andrisoft:andrisoft /opt/andrisoft/dumps/[server_id]
[root@console ~]# mkdir -p /opt/andrisoft/flows/[server_id]
[root@console ~]# chown andrisoft:andrisoft /opt/andrisoft/flows/[server_id]
Ensure ports 2049 (NFS) and 111 (RPC) are open in the remote server’s firewall. Refer to your Linux distribution’s documentation on how to open these ports if they are closed. You can check the firewall status by running:
[root@remote ~]# ufw status || firewall-cmd --list-all-zones || iptables -L -n -v && iptables -t raw -L -n -v
Restart the NFS service on the remote server:
[root@remote ~]# systemctl restart nfs-kernel-server
[root@remote ~]# systemctl enable nfs-kernel-server
Mount on the Console server the directories exported by the remote server:
[root@console ~]# mount /opt/andrisoft/dumps/[server_id]
[root@console ~]# mount /opt/andrisoft/flows/[server_id]
Note: If you plan to remove an NFS-linked directory from your Console server, unmount it first with
umount -l -f /opt/andrisoft/...
Configure the remote server with the same time zone as the Console server. This ensures consistent timestamps for packet captures and flow data.
Install the necessary packages on the Console server:
[root@console ~]# dnf install nfs-utils
Install the necessary packages on the remote server:
[root@remote ~]# dnf install nfs-utils
Find the Server ID of the remote server by executing
/opt/andrisoft/bin/WANmaintenance show_serverson the Console server. You will replace [server_id] with this number in the following steps.Find the UID and GID of the
andrisoftuser account on the Console server by executing:
[root@console ~]# id andrisoft
uid=4097(andrisoft) gid=4097(andrisoft) groups=4097(andrisoft)
In this particular case, in the next step you should replace [andrisoft_uid] with 4097 and [andrisoft_gid] with 4097.
On the remote server, add the following lines to the /etc/exports.d/wanguard.exports file:
/opt/andrisoft/dumps/[server_id] [console_ip](no_subtree_check,rw,anonuid=[andrisoft_uid],anongid=[andrisoft_gid])
/opt/andrisoft/flows/[server_id] [console_ip](no_subtree_check,rw,anonuid=[andrisoft_uid],anongid=[andrisoft_gid])
Execute on the remote server:
[root@remote ~]# mkdir -p /opt/andrisoft/dumps/[server_id]
[root@remote ~]# chown -R andrisoft:andrisoft /opt/andrisoft/dumps/[server_id]
[root@remote ~]# mkdir -p /opt/andrisoft/flows/[server_id]
[root@remote ~]# chown -R andrisoft:andrisoft /opt/andrisoft/flows/[server_id]
On the Console server, add the following lines to the /etc/fstab file:
[sensor_ip]:/opt/andrisoft/dumps/[server_id] /opt/andrisoft/dumps/[server_id]  nfs  soft,bg,_netdev
[sensor_ip]:/opt/andrisoft/flows/[server_id] /opt/andrisoft/flows/[server_id]  nfs  soft,bg,_netdev
Execute on the Console server:
[root@console ~]# mkdir -p /opt/andrisoft/dumps/[server_id]
[root@console ~]# chown andrisoft:andrisoft /opt/andrisoft/dumps/[server_id]
[root@console ~]# mkdir -p /opt/andrisoft/flows/[server_id]
[root@console ~]# chown andrisoft:andrisoft /opt/andrisoft/flows/[server_id]
[root@console ~]# systemctl daemon-reload
Make sure ports 2049 (NFS) and 111 (RPC) are open in the remote server’s firewall. Use:
[root@remote ~]# firewall-cmd --list-all-zonesIf the ports are closed, you can create a separate zone where you can control allowed services AND allowed hosts with:
[root@remote ~]# firewall-cmd --permanent --new-zone=20-wanguard-nfs
[root@remote ~]# firewall-cmd --zone=20-wanguard-nfs --permanent --add-service=nfs3
[root@remote ~]# firewall-cmd --zone=20-wanguard-nfs --permanent --add-service=mountd
[root@remote ~]# firewall-cmd --zone=20-wanguard-nfs --permanent --add-service=rpc-bind
[root@remote ~]# firewall-cmd --zone=20-wanguard-nfs --permanent --add-source=[console_ip]/32
[root@remote ~]# firewall-cmd --reload
Restart the NFS service on the remote server:
[root@remote ~]# systemctl start nfs-server.service
[root@remote ~]# systemctl enable nfs-server.service
[root@remote ~]# systemctl status nfs-server.service
Mount on the Console server the directories exported by the remote server:
[root@console ~]# mount /opt/andrisoft/dumps/[server_id]
[root@console ~]# mount /opt/andrisoft/flows/[server_id]
Note: If you plan to remove an NFS-linked directory from your Console server, unmount it first with
umount -l -f /opt/andrisoft/...
Configure the remote server with the same time zone as the Console server. This ensures consistent timestamps for packet captures and flow data.
16.4. Transferring Console
If you want to move your Console to a new server, please follow these steps:
On the old server:
1. Stop all Components from Configuration » Components.2. Stop the WANsupervisor service and back up the database:[root@old_console ~]# service WANsupervisor stop [root@old_console ~]# /opt/andrisoft/bin/WANmaintenance backup_db
On the new server:
1. Follow the software installation instructions for the Console.2. If you had a running Console on this machine, stop all Components from Configuration » Components.3. Stop WANsupervisor if it’s running:[root@new_console ~]# service WANsupervisor stop4. In case you have a Console set up on this machine, make a backup of its configuration:[root@new_console ~]# /opt/andrisoft/bin/WANmaintenance backup_db5. Copy the backup file from your OLD machine to the NEW machine:[root@new_console ~]# scp -r user@old_machine:/root/wanguard_db_backup_xxxx_xx_xx_xx_xx.sql /root6. Restore the backup on the new machine:[root@new_console ~]# mysql -p andrisoft < /root/wanguard_db_backup_xxxx_xx_xx_xx_xx.sql7. Go to Configuration » Servers and change the IP Address for each server.8. Update the configuration of all Components in order to reflect the interfaces and IP addresses of the new machine.9. Start the WANsupervisor service:[root@new_console ~]# service WANsupervisor startIf you use InfluxDB, follow the Back up and restore InfluxDB article to move the graph data from the old server to the new server.
On any remote server that runs other software components:
1. Update the software packages to the latest version, and execute on each one:[root@remote_server ~]# /opt/andrisoft/bin/install_supervisorWhen prompted, provide the new Console IP and database password.2. Restart the WANsupervisor service:[root@remote_server ~]# service WANsupervisor restart
16.5. Fault-Tolerant Console Setup
The Distributing Sensors and Filters section describes how to add redundant servers that run other software components. If the Console becomes unavailable due to a network, hardware, or power failure, you can switch to a secondary Console server with minimal downtime and no data loss:
1. Install a secondary Console server that fulfills the system requirements.2. On the primary Console server, stop all components from Configuration » Components, then log out.3. Connect to each remote server that uses the primary Console and stop the WANsupervisor service:[root@remote ~]# service WANsupervisor stop4. On the primary Console server, execute:[root@primary ~]# service WANsupervisor stop [root@primary ~]# service apache2 stop || service httpd stop [root@primary ~]# /opt/andrisoft/bin/WANmaintenance db_convert_to_innodb [root@primary ~]# mkdir /opt/andrisoft/sql/primary ; cd /opt/andrisoft/sql/primary [root@primary ~]# /opt/andrisoft/bin/WANmaintenance backup_dbInnoDB has worse read performance than MyISAM or Aria, but it is the only database engine that supports replication. You can improve its performance by tuning InnoDB-specific parameters in the MariaDB configuration file.
5. On the secondary server, follow the Console software installation instructions from the download link sent to you when entering the trial program.6. Execute on the secondary Console server:[root@secondary ~]# service WANsupervisor stop [root@secondary ~]# service apache2 stop || service httpd stop [root@secondary ~]# /opt/andrisoft/bin/WANmaintenance backup_db7. Transfer the backup file generated at step 4 to the secondary Console server and import it:[root@secondary ~]# mkdir /opt/andrisoft/sql/primary [root@secondary ~]# scp root@<primary_server_IP>:/opt/andrisoft/sql/primary/wanguard_db_backup*.sql /opt/andrisoft/sql/primary [root@secondary ~]# mysql -p andrisoft < /opt/andrisoft/sql/primary/wanguard_db_backup*.sql8. On the secondary Console server, put the primary Console IP in /opt/andrisoft/etc/dbconsole.conf:[root@secondary ~]# nano /opt/andrisoft/etc/dbconsole.conf9. Follow the instructions needed for replicating the database from the primary server to the secondary server. An example for MariaDB can be found here. Distribution-specific instructions can be found on the Internet.10. Once the replication is done and the databases are in sync, execute on the primary Console server:[root@primary ~]# service WANsupervisor start [root@primary ~]# service apache2 start || service httpd start11. Connect to each remote server, if any, and restart the WANsupervisor service:[root@remote ~]# service WANsupervisor restart12. In the Console on the primary server, start all components from Configuration » Components. In General Settings » Graphs & Storage, set the InfluxDB from the secondary server as Graph Storage Engine 2. By default, InfluxDB is only accessible from localhost, so you might need to edit /etc/influxdb/influxdb.conf to allow the primary server to connect.
16.6. Disaster Recovery Steps for Console
If the primary Console server in a Fault-Tolerant Console Setup setup becomes unavailable, follow these steps:
1. Execute on the secondary Console server:[root@secondary ~]# mysql -pEnter the password if requested. Execute in the MariaDB client:MariaDB [(none)]> stop slave; MariaDB [(none)]> reset slave; MariaDB [(none)]> exit;2. Execute on the secondary server:[root@secondary ~]# rm /opt/andrisoft/etc/dbconsole.conf [root@secondary ~]# service WANsupervisor restart [root@secondary ~]# service apache2 start || service httpd start3. On the secondary Console, go to Configuration » Servers » Console and replace the IP of the primary server with the IP of the secondary server. Then, in Configuration » General Settings » Graphs & Storage, set Graphing Engine Backend to Graph Storage Engine 2.4. Connect to each remote server (if any) and run:[root@remote ~]# /opt/andrisoft/bin/install_supervisor # enter the secondary Console IP [root@remote ~]# service WANsupervisor restart5. Make sure that all components are running correctly by monitoring Reports » Devices » Overview.