12. Network & Policy » Response
Responses are a powerful and flexible way to automate and extend how the system reacts to anomalies detected by Sensors and filtering rules identified by Filters. For each IP, subnet, threshold, or anomaly type, the system can trigger a distinct Response.
To add a new Response, go to Configuration » Network & Policy » [+] and click [Response].
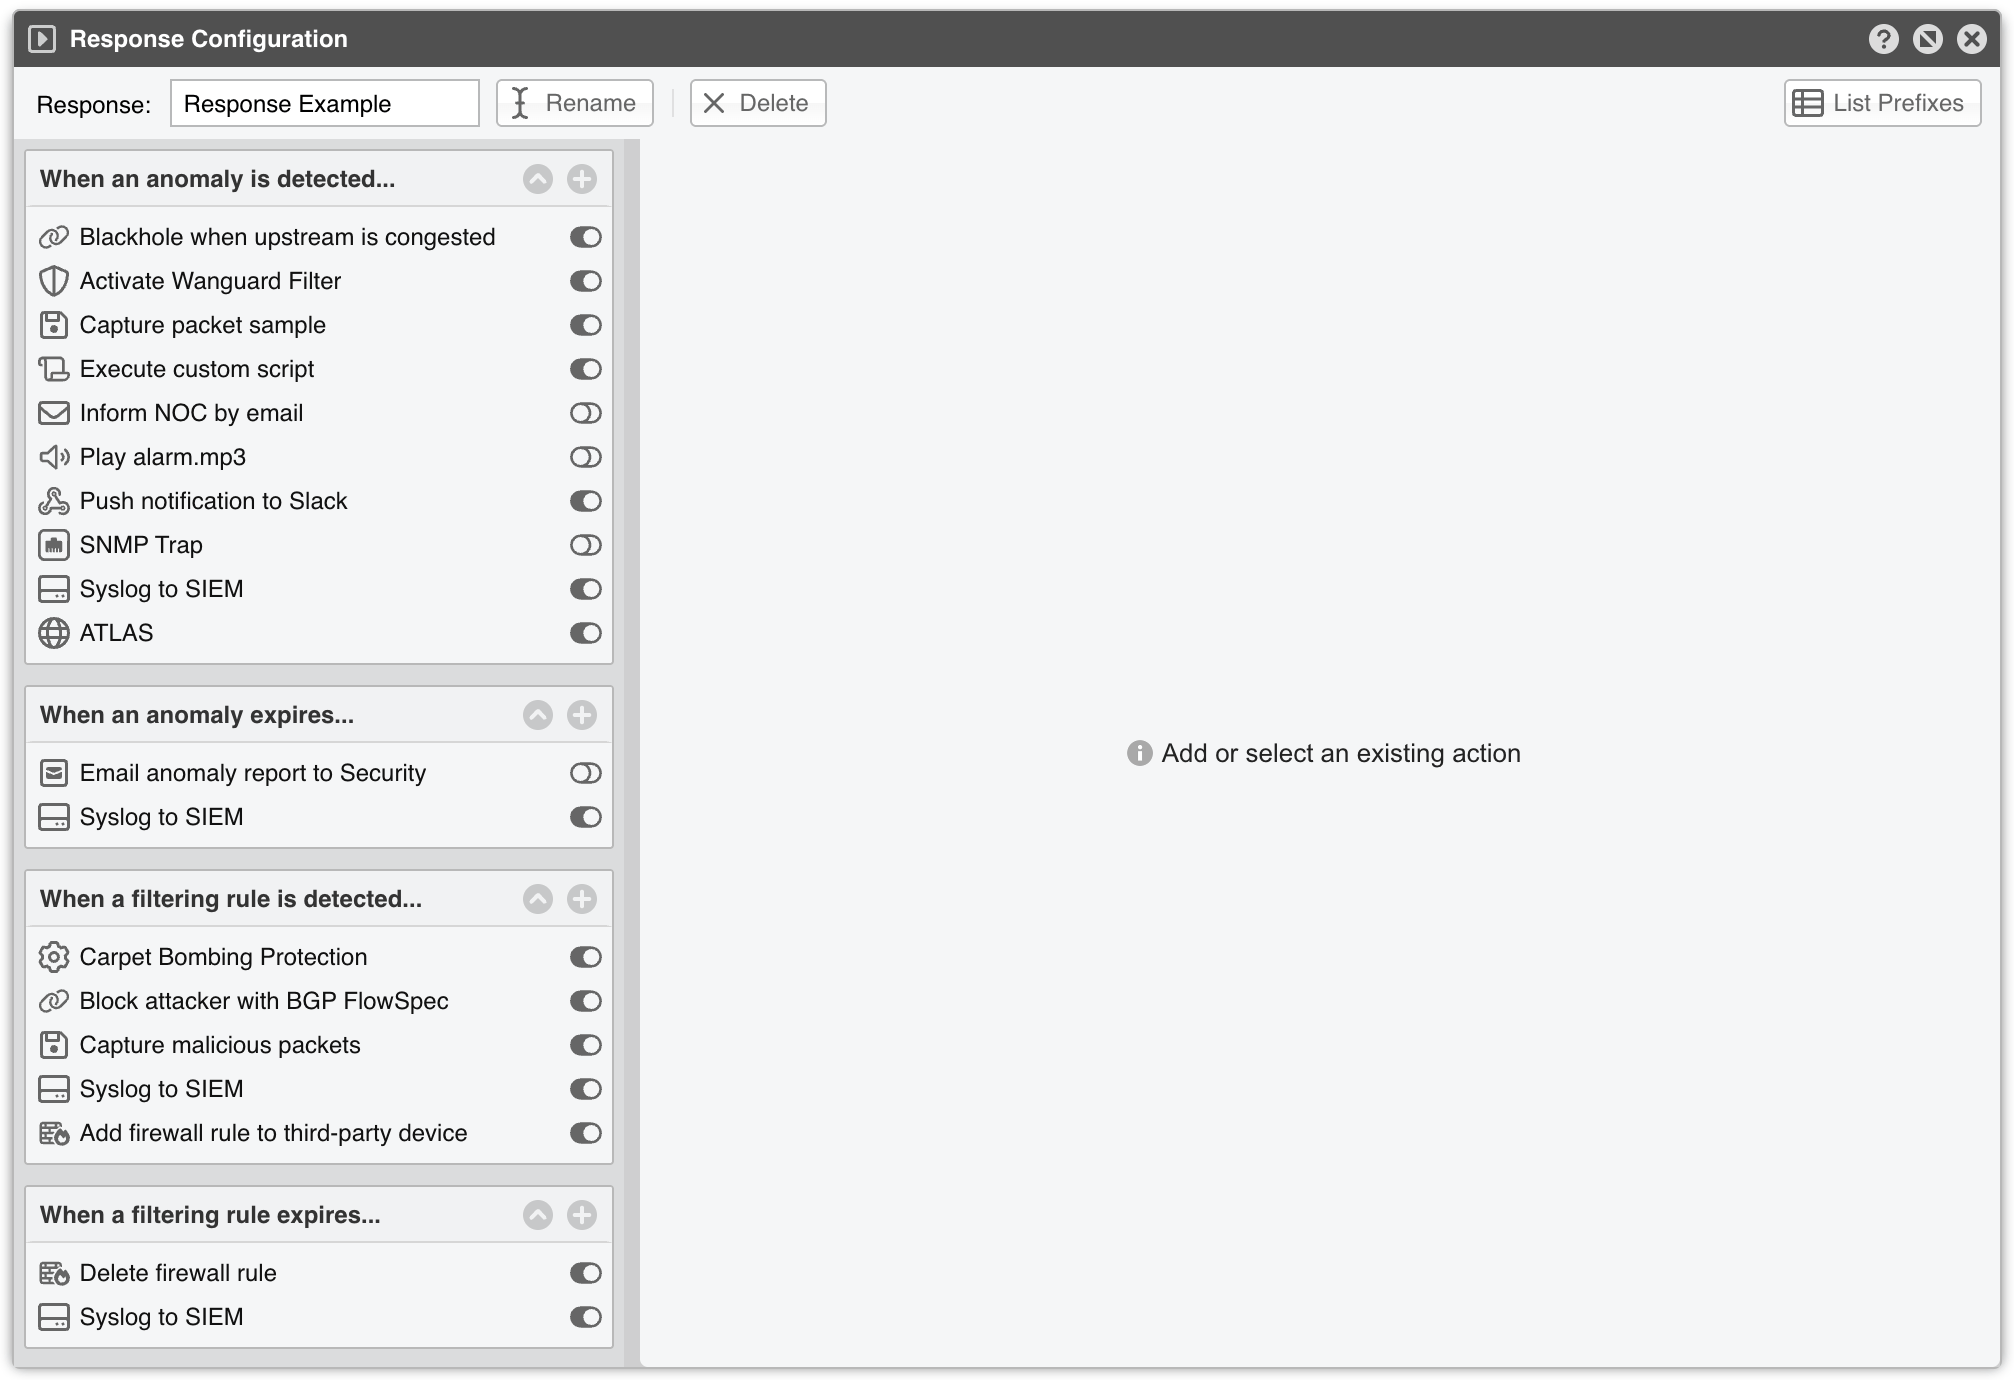
The top bar of the Response Configuration window carries the name of the Response, followed by [Rename], which applies the new name straight away, and [Delete], which asks for confirmation before removing the Response and closing the window. On the right-hand side, [List Prefixes] opens a window with the prefixes configured to use this Response.
Below the top bar, the window is split in two: the left-hand side holds the four action panels described in the next section, while the right-hand side shows either the action picker or the configuration of the action you selected.
12.1. Response Actions
When invoked by a Sensor or Filter, the Response runs the actions it contains. These built-in modules provide the means to execute commands, send notifications, send BGP routing updates, write logs, etc.
There are two types of actions:
Anomaly Actions are executed by Sensor for each traffic anomaly. To execute such an action immediately upon the detection of an anomaly or while an anomaly is being detected, add it to the When an anomaly is detected… panel. To execute an action when the anomaly expires, add it to the When an anomaly expires… panel
Filtering Rule Actions are executed for each filtering rule identified by Filter. To execute such an action immediately upon the identification of a filtering rule or while a filtering rule is being identified, add it to the When a filtering rule is detected… panel. To execute an action when the filtering rule expires, add it to the When a filtering rule expires… panel
To add an action, click the [+] button from the title bar of the relevant panel on the left-hand side of the window. This opens the Select an action list, which offers only the actions that are meaningful for that panel — the anomaly report, for instance, is offered only when an anomaly expires. Clicking the title of a panel collapses or expands it.
To view, edit, delete or rename an action, select the action’s name: its configuration opens on the right-hand side, with [Save] and [Delete] at the bottom. To enable or disable an action, click the on/off switch next to it; right-clicking the switch does the same. The switch takes effect immediately, without saving the action.
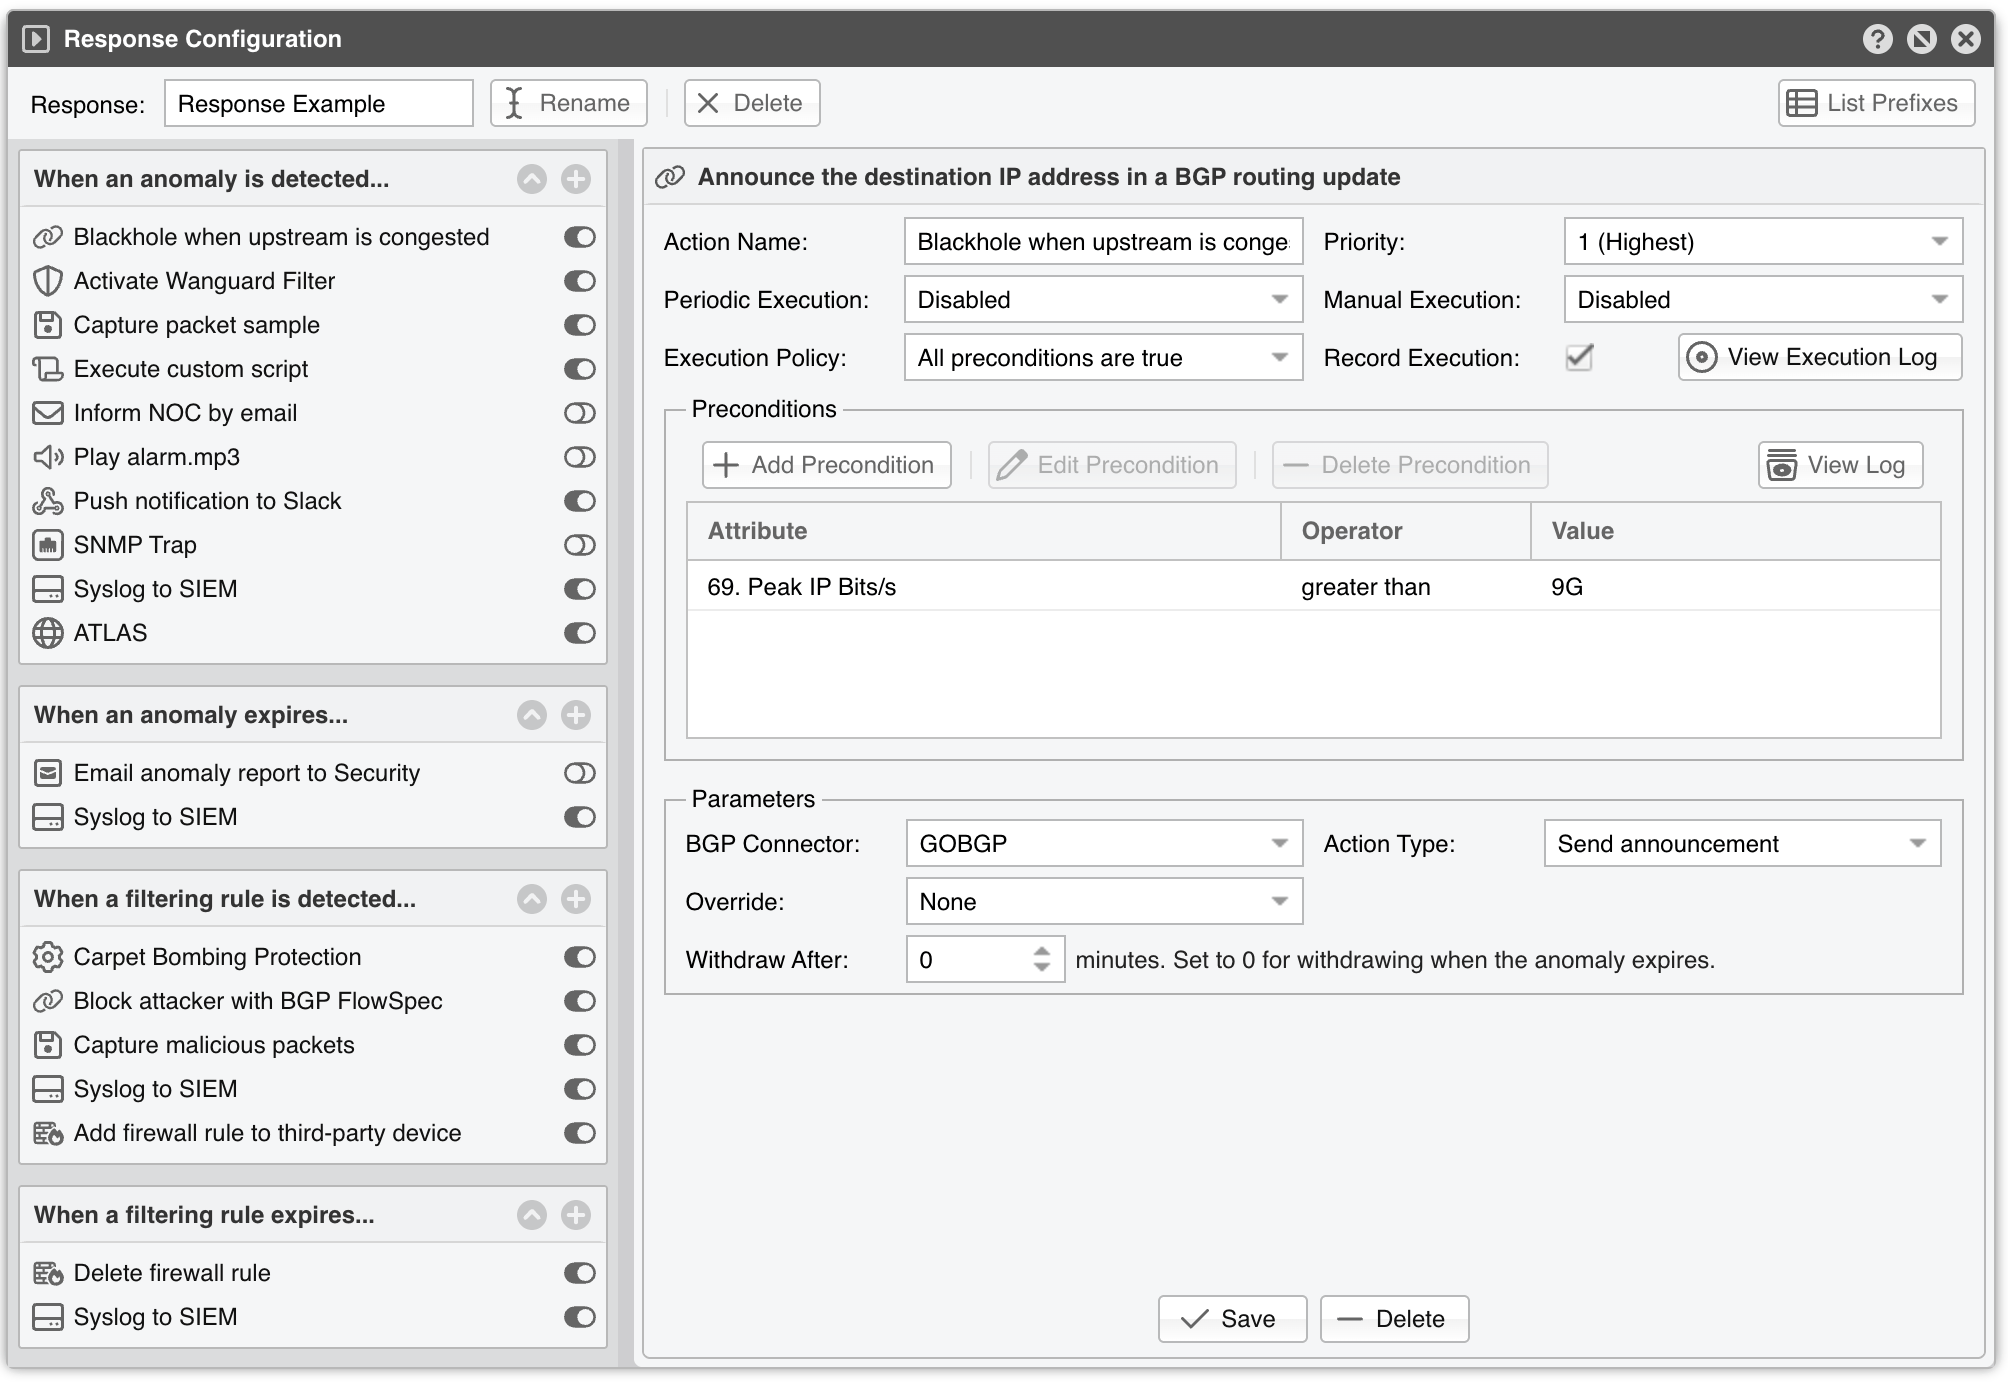
Each action configuration panel contains some action-specific fields, gathered in a Parameters fieldset. The following fields are present in all actions:
● Action Name – Short description of the action. It cannot be left empty, and it is the name listed in the left-hand panel● Priority – Select the order of execution relative to the other actions defined within the same panel, from 1 (Highest) through 5 (Medium) to 9 (Lowest). Lower numerical values correspond to increased priority● Periodic Execution – When set to Disabled, the action is executed once per anomaly/filtering rule. When set to Enabled, it is executed continuously, once every 5 seconds for Packet Sensor, Packet Filter, Sensor Cluster, and Filter Cluster, or once every 5-60 seconds for Flow Sensor, depending upon its Granularity parameter● Manual Execution – When set to Enabled, the action is executed only manually, by an Operator or Administrator that clicks the lightning icon in Reports » Tools » Anomalies. Otherwise, the action is executed automatically, without end-user intervention● Execution Policy – All preconditions are true executes the action only when every precondition (defined below) is evaluated as true. Any precondition is true executes it when at least one precondition is evaluated as true. Precondition expression is true swaps the preconditions grid for the Precondition Expression editor and executes the action only when that expression evaluates as true. The action is executed without restrictions when the list of preconditions is empty● Record Execution – When checked, the name of the action is recorded and displayed in anomaly reports. The [View Execution Log] button next to it lists the moments the action ran, together with the anomaly number, the filtering rule number for filtering rule actions, and the command line for the actions that run a script● Preconditions – May contain rules that, when evaluated as false, will deny the action’s execution. Use [Add Precondition], [Edit Precondition], and [Delete Precondition] to manage the list. Each precondition is composed of an attribute (conditional parameter), an operator (comparison function), and a user-defined value. The attributes are grouped into Anomaly-related, Time-related, IP Decoder-related, Filter-related, and System-wide; filtering rule actions offer an additional Filtering Rule-related group. The available operators are equal to, not equal to, less than, greater than, divisible by, includes, excludes, included in, excluded from, and regexp. The attributes are linked to tokens (internal variables whose values are constantly updated by Sensors and Filters). Appendix 4 - Conditional Parameters & Tokens lists and describes each attribute● Precondition Expression – As an alternative to a list of simple preconditions, you can write a free-form boolean expression that combines any number of tokens with comparison operators, and/or logic, and parentheses, for example{anomaly_bps} > 1G and {decoder} = "NTP". The operators, the way values are written, and more examples are described in Expression Syntax. Click [Check Syntax], which becomes available as soon as the editor is not empty, to validate the expression — syntax errors, unknown tokens, and operator/operand type mismatches are reported with their line and column
Both the preconditions grid and the expression editor carry a [View Log] button that shows how they were evaluated during past executions. The preconditions log lists, for every evaluation, the attribute, its real value at run-time, the operator, the configured value, and the Pass or Not Pass result. Like [View Execution Log], these buttons stay disabled until the action has been saved at least once, and for the same reason a brand-new action has no [Delete] button.
A Token is a placeholder that can be used as a parameter or script argument in most Response actions because, at run-time, the software translates it into the requested value. Each token is defined within curly brackets, { and }. Every token is listed in Appendix 4 - Conditional Parameters & Tokens.
12.2. Extending the Built-in Preconditions
If you need to extend the logic that decides whether actions are allowed to run, the simplest option is to write a Precondition Expression that mixes logical disjunction and conjunction in any way you wish. When the decision requires data that is not available as a token, use the attribute named Custom Script Return Value instead: set the Operator field to “equal to”, and in the Value field enter the path to a custom script that accepts tokens (full list in Appendix 4 - Conditional Parameters & Tokens) as arguments.
To access data not related to the current anomaly or filtering rule, or to automate the actions available on Reports » Tools, call the REST API from within your script.
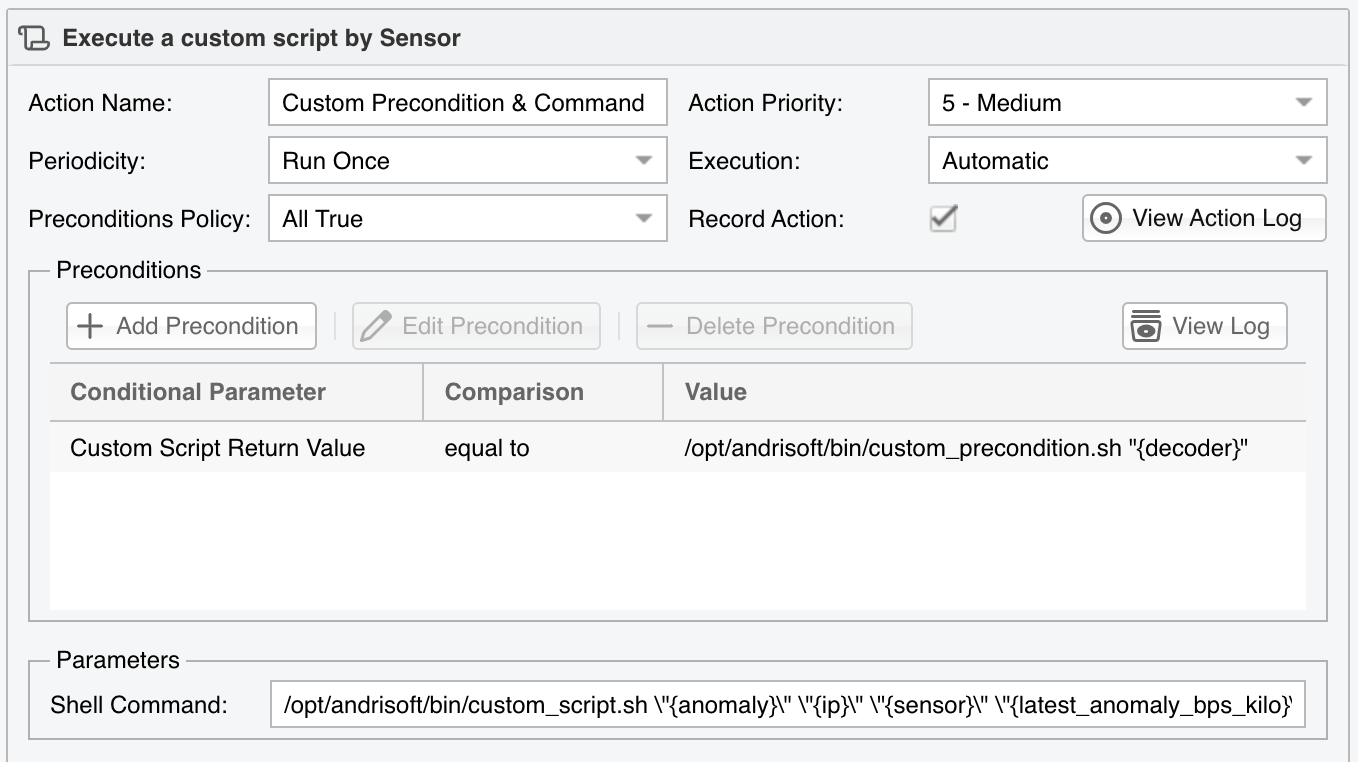
#!/bin/sh

DECODER=$1

if [ "$DECODER" = "NTP" ] || [ "$DECODER" = "SNMP" ];
then
 exit 0;
else
 exit 1;
fi
12.3. Expression Syntax
The Precondition Expression of a Response action and the Validation Expression from General Settings » Anomaly Detection share the same syntax. An expression is a single condition built from comparisons that are joined with and, or and not and grouped with parentheses. Each comparison has a token on the left, an operator, and a value or another token on the right:
{anomaly_bps} > 1G and {decoder} = "NTP"
The preconditions grid uses Attributes and operator names. An expression uses the Tokens listed in Appendix 4 - Conditional Parameters & Tokens and the following operators:
Operator |
Name in the preconditions grid |
Example |
|---|---|---|
|
equal to |
|
|
not equal to |
|
|
greater than, less than |
|
|
not available in the grid |
|
|
divisible by |
|
|
includes, excludes |
|
|
included in, excluded from |
|
|
regexp |
|
The values are written as follows:
{anomaly_bps}. A token can also be used on the right side: {anomaly_bps} > {computed_threshold}{decoder} = "TCP+SYN". The quotes can be omitted for a single word{anomaly_pps} > 100k. The multipliers k, M and G must follow the digits directly. "1000", 1 G, 1Gbps, 1,000 and 50% are read as text, not as numbers{prefix} in 10.0.0.0/8Equality is written with a single =, and the logical operators only as words: ==, &&, || and ! are rejected. Arithmetic is not supported, so {computed_threshold} * 2 does not double the threshold. The reg operator takes a POSIX extended regular expression.
An expression can span several lines and can start with comment lines introduced by # or //:
# Large DNS or NTP attacks during business hours
({decoder} = "DNS" or {decoder} = "NTP")
and {anomaly_bps} > 1G
and {from_hour} >= 9 and {from_hour} < 18
More examples, one expression per line:
not {prefix} in 10.0.0.0/8
{anomaly_bps} > {computed_threshold} and {link_severity} >= 50
{decoder} reg "^TCP" and {duration} > 300
[Check Syntax] reports errors and warnings. An error, such as an unknown token, a missing value or an unmatched parenthesis, makes the expression invalid. A warning, such as a number compared with text or a condition that is always true or always false, does not, so read the warnings as well.
12.4. Built-in Response Actions
The action picker offers a different list for each of the four panels, so not every action below can be added everywhere. Actions that only make sense while something is happening — the BGP announcement, the packet capture, the Filter activation — are offered when an anomaly or a filtering rule is detected. The notification actions (email, third-party provider, Syslog, SNMP trap, Console notification) and Execute a command or script are offered in all four panels, in an anomaly flavor and a filtering rule flavor that differ only by the tokens they can use. Participate in A.T.L.A.S. is unavailable to users with the Guest role.
12.4.1. Announce the destination IP address in a BGP routing update
Use this action to announce the anomaly’s prefix in a BGP routing update. To prevent uplink network congestion, set up D/RTBH by following Appendix 3 from the User Guide. Add a severity-related Precondition (e.g., Peak Link Severity) to avoid blackholing during weak attacks.
Select the BGP Connector that carries the update and whether the Action Type is Send announcement or Withdraw announcement. Withdraw After is expressed in minutes; set it to 0 to withdraw the announcement when the anomaly expires. Override lets a single BGP attribute — BGP Neighbor, AS Number, Route Map, Community, Extended Community, Large Community, Redirect (IP/VRF), or Other Parameter — be replaced at run-time with the contents of Override Value.
12.4.2. Capture a sample of malicious packets
Use this action to capture a packet sample with the anomaly’s traffic. Capturing packets is possible only for anomalies detected by Packet Sensor. Limit the size of the packet dump or use the second Sampling Type option.
The capture is bounded by Max. Packets, Max. File Size (MB), Max. Files Number, Max. Running Time (Unlimited, or from 5 seconds to 5 days) and Time Rotation (s). Snapshot (bytes / pkt) truncates each packet, while Packet Payload stores it Full, Only Layer 3, or Only Layer 4. Sampling Type is None, 1 / Value (one packet out of every Sampling Value), or Value / 5s (at most Sampling Value packets every five seconds). Filename Prefix names the resulting files.
12.4.3. Detect filtering rules and mitigate the attack with Wanguard Filter
Use this action to activate a Wanguard Filter instance that detects which filtering rules can mitigate the attack. You can define a Precondition to activate the Filter only when the attack is strong enough. Wanguard Filter stops automatically when the anomaly expires.
Choose the instance in Wanguard Filter. When the traffic must first be diverted towards the filtering server, set Traffic Diversion and the Diversion IPv4 CIDR and Diversion IPv6 CIDR announced by the selected BGP Connector.
12.4.4. Execute a command or script
Use this action if you want to extend the software’s capabilities with custom scripts or commands. You can pass the tokens listed in Appendix 4 as arguments to the command. Use sudo to elevate privileges if the command or script needs root privileges.
Execute On decides where the command runs: on the Sensor Server or Filter Server that raised the event, or on the Console Server. Shell Command is mandatory and holds the command line together with its tokens. Whatever you type in Pass to STDIN (Standard Input) is written to the command’s standard input, which is the practical way to hand over a large token such as {json_anomaly_tokens}.
12.4.5. Modify an anomaly parameter
Use this action to change or update specific details of an anomaly, such as its status, description, or expiration time, based on custom conditions or requirements.
The Action field selects what to change: Change Anomaly Status (to Finished or Expired), Change Anomaly Name, Change Expiration Time, or Set Comments. The field that holds the new value appears next to it once you make the choice.
12.4.6. Send a custom email notification
Use this action to send informative emails during anomalies. Customize the sender and the delivery method in Configuration » General Settings » Outgoing Email.
Fill in To, optionally C.C., and compose the Subject and Body with any of the tokens.
12.4.7. Send a custom notification to a third-party provider
Use this action to send alerts to an external service provider. Pick one in the Provider field, which also offers None to keep the action configured without sending anything, and write the Message that carries the notification. The remaining fields depend on the provider:
12.4.7.1. Pushover
Pushover is a service that allows you to send push notifications to mobile devices and desktops. Enter the User/Group Key and the API Token issued by Pushover. Priority ranges from Lowest Priority to Emergency Priority, Sound selects one of the Pushover tones, Device restricts the notification to a single device instead of all of them, Title overrides the default message title, and Time to Live expires the notification after the given number of seconds. Time to Live is unavailable at Emergency Priority.
12.4.7.2. Slack
Slack is an enterprise group chat platform. Wanguard uses the Slack webhooks API to send notifications. The only additional field is the Slack Webhook URL.
12.4.7.3. Telegram
Telegram is a messaging application available for many platforms including iOS, Android, Windows, macOS and Linux. Enter the Bot Token and the Chat Identifier that receives the message. API Endpoint defaults to api.telegram.org and only needs to be changed when a proxy stands in for the Telegram API.
12.4.8. Send a custom Syslog message
Use this action to send a custom Syslog message. Use Syslog for central log collection, compliance, and reporting to a SIEM.
Set the Syslog Host that receives the message, the Syslog Hostname it is reported under, the Syslog Facility and Syslog Severity, and the Message itself. The Syslog Host defaults to localhost, which delivers the message to the Syslog service running on the Console server.
12.4.9. Send a custom SNMP trap
Use this action to send a custom SNMP trap to a management station. SNMP traps are sent using the snmptrap command executed on the Console server.
Enter the SNMP Host of the management station, the Community string, the SNMP OID of the trap, and the Trap Message.
12.4.10. Send a visual or audio notification to logged-in Console users
Use this action to notify all logged-in Console users that an anomaly has been detected. Permit user accounts to receive notifications in Configuration » General Settings » User Management. Upload custom audio notification files to /opt/andrisoft/webroot/mp3.
Tick Visual Notification to raise a pop-up carrying the accompanying message, and pick a file in Audio Notification to play a sound. The two are independent, so an action may do either or both.
12.4.11. Participate in A.T.L.A.S. with anomaly statistics
Members of A.T.L.A.S. are provided with a globally-scoped view into malicious activities. Enterprise support customers benefit from Global NOC supervision and managed security services. The action has no parameters of its own.
12.4.12. Generate an anomaly report and send it by email
Use this action to generate a full anomaly report—after the anomaly has finished—and then send it by email to relevant recipients. It is therefore offered only in the When an anomaly expires… panel.
The Report Parameters select the Content Format and which sections the report carries: Summary, Summary Graph, Details, Sensor Logs, Mitigation, Mitigation Graph, and Mitigation Logs. The Email Parameters hold the To, C.C., and Subject of the message that delivers it.
12.4.13. Announce a BGP routing update with Flowspec or S/RTBH
Use this action to mitigate attacks with Flowspec or S/RTBH. Deploy BGP Flowspec to mitigate attacks by dropping the malicious traffic on the edge router. Filtering rules compatible with Flowspec are listed in Configuration » General Settings » Anomaly Mitigation.
It offers the same parameters as the announcement of an anomaly’s prefix, described above, but announces the filtering rule instead.
12.4.14. Apply/delete the filtering rule on a third-party inline device
Use this action with custom scripts that push filtering rules to an inline third-party device when the rules are detected, and delete them when they expire. Install custom ACLs on existing inline appliances such as routers, IPSes, firewalls and load balancers. Helper wrapper scripts are not included.
It is a single action that appears twice in the picker: as Apply the filtering rule on a third-party inline device when a filtering rule is detected, and as Delete the filtering rule on a third-party inline device when it expires. Both take the same fields as Execute a command or script, so the script that installs the ACL and the one that removes it are configured the same way.
12.4.15. Participate in A.T.L.A.S. with filtering rule statistics
Use this action to contribute filtering rule statistics to A.T.L.A.S. Members of A.T.L.A.S. are provided with a globally-scoped view into malicious activities.
12.4.16. Capture a sample of packets matched by the filtering rule
Use this action to capture a packet sample of the traffic that matches the filtering rule. The capturing process stops automatically when the filtering rule expires. Limit the size of the packet dump or use the second Sampling Type option. It offers the same parameters as the capture of an anomaly’s packets, described above.
12.4.17. Modify a filtering rule parameter
Use this action to modify the CIDR mask of the attacker or victim, or to whitelist or stop the filtering rule. For example, you can change the CIDR mask for Flowspec to more efficiently mitigate carpet-bombing attacks. To ensure the CIDR mask changes take effect before the firewall or Flowspec rule is applied, set the priority of this action to Highest.
The Action field offers Modify the victim’s CIDR mask in the associated Flowspec/firewall rules, Modify the attacker’s CIDR mask in the associated Flowspec/firewall rules, Whitelist the filtering rule, and Stop the filtering rule. The first two reveal the IPv4 CIDR Mask and IPv6 CIDR Mask fields that carry the new masks.
12.5. Extending the Built-in Actions
If you want to extend the number of actions, add the Response action named Execute a command or script. You can pass useful information collected from Wanguard as arguments to your script. Make sure that the script can be run as the andrisoft user, and that your script does not require any input from the terminal during execution. You can check if the permissions of the andrisoft user are sufficient by executing the script from the CLI with the sudo -u andrisoft /path/to/your/script.sh command. It is recommended to output the script’s output to a temporary file, in order to catch any errors, by appending > /tmp/script_output.txt 2>&1 to the command. That way you can verify the script’s output in /tmp/script_output.txt.
As an example, the script shown below will write the anomaly number ({anomaly_id} as 1st argument), attacked IP ({ip} as 2nd argument), detecting Sensor ({sensor} as 3rd argument), and current kbits/s value ({latest_anomaly_bps_kilo} as 4th argument) to a temporary file when the decoder that detected the anomaly is either NTP or SNMP.
#!/bin/sh

echo "Anomaly: $1, IP: $2, Sensor: $3, Kbits/s: $4" > /tmp/test.txt
Note
When writing a script, make sure that it can be accessed and executed by the system account named andrisoft. You can check if there are permission-related issues by executing the script manually with sudo -u andrisoft /path/to/script. The tokens should be passed within single or double quotes.