11. General Settings » Anomaly Mitigation
In Configuration » General Settings » Anomaly Mitigation, you can configure and fine-tune the behavior of Wanguard Filter.
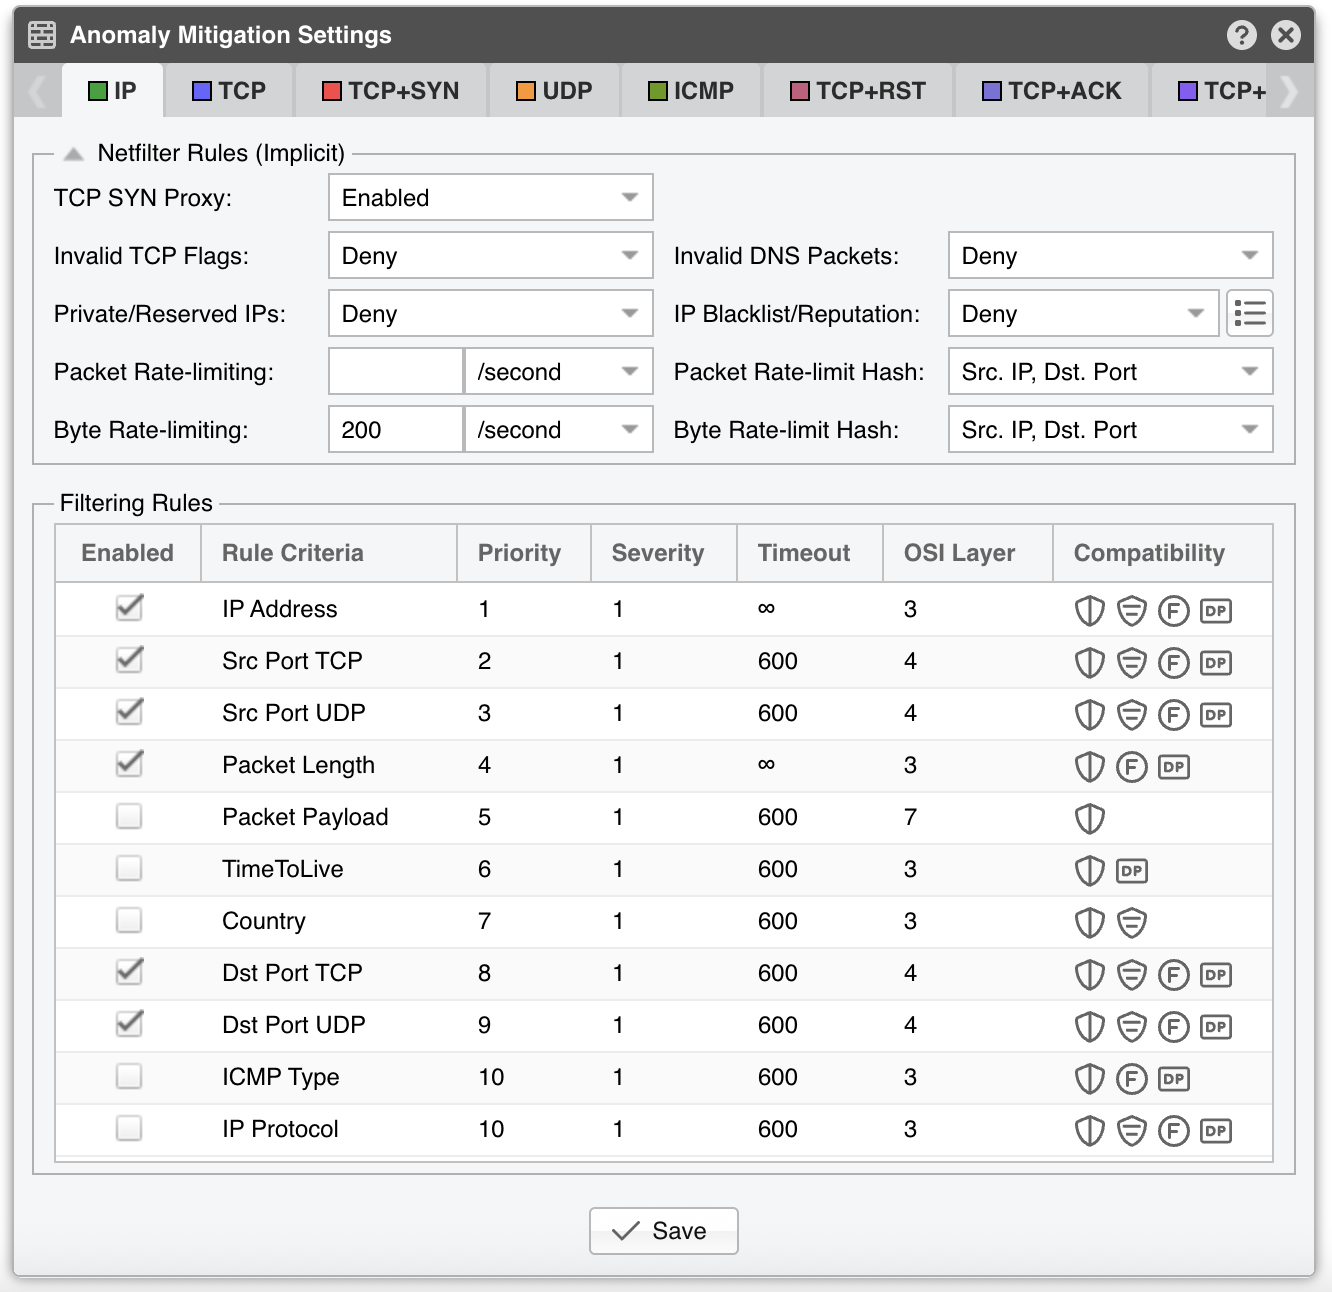
The window contains one tab per decoder, each labeled with the decoder’s name and the color it uses in graphs. A decoder is given a tab only when it is enabled in the Decoders for Thresholds list of Anomaly Detection and its Filter Engine is not set to Disabled in Custom Decoders. Every tab holds the same two sections – Netfilter Rules (Implicit) and Filtering Rules – and its own [Save] button.
Note
These configuration options apply only to the currently selected tab or decoder. Each tab is loaded and saved on its own, so [Save] stores the settings of the decoder you are looking at and leaves the other tabs untouched. To modify the list of decoders, go to Configuration » General Settings » Anomaly Detection.
11.1. Netfilter Rules (Implicit)
The following rules are always applied when the Netfilter firewall is being used. Not all of them are offered on every tab: TCP SYN Proxy and Invalid TCP Flags can only be set on decoders whose Filter Engine is Generic IPv4/IPv6, TCP, or TCP and UDP, while Invalid DNS Packets also accepts UDP. On the remaining decoders those three fields are grayed out.
● TCP SYN Proxy – Set to Enabled or Disabled. When enabled, Wanguard Filter activates a SYN proxy mechanism provided by Netfilter immediately after its initialization. This mechanism shields servers from SYN flood attacks by verifying the WAN clients before forwarding their connection requests to the protected server. For this option to work, Wanguard Filter must be deployed inline and must receive both incoming and outgoing traffic.
When the filtering server applies a SYN proxy to a TCP connection, it responds to the initial SYN packet with a manufactured SYN/ACK reply and waits for the ACK in response before forwarding the connection request to the server. Devices attacking with SYN flood packets do not respond to the SYN/ACK reply. The firewall identifies them by their lack of this type of response and blocks their spoofed connection attempts. SYN proxy forces the firewall to manufacture a SYN/ACK response without knowing how the server will respond to the TCP options normally provided on SYN/ACK packets.
Some commands required to enable the SYN Proxy feature are listed below. This guide does not cover all steps needed for enabling SYN proxy.
[root@localhost ~]# echo 1000000 > /sys/module/nf_conntrack/parameters/hashsize
[root@localhost ~]# /sbin/sysctl -w net/netfilter/nf_conntrack_max=2000000
[root@localhost ~]# /sbin/sysctl -w net/netfilter/nf_conntrack_tcp_loose=0
[root@localhost ~]# /sbin/sysctl -w net/ipv4/tcp_timestamps=1
● Invalid TCP Flags – Set to Permit or Deny. When set to Deny, Wanguard Filter blocks all invalid TCP flags immediately after its activation. The necessary filtering rules for this option are applied by the Netfilter firewall for traffic forwarded to/from the attacked destination
● Invalid DNS Packets – Set to Permit or Deny. When set to Deny, Wanguard Filter blocks all invalid DNS traffic (illegal combination of source port and destination port) immediately after its activation. The necessary filtering rules for this option are applied by the Netfilter firewall for traffic forwarded to/from the attacked destination
● Private/Reserved IPs – Set to Permit or Deny. When set to Deny, Wanguard Filter blocks all private or reserved IPv4 or IPv6 subnets immediately after activation. The required filtering rules are applied by the Netfilter firewall for traffic forwarded to/from the attacked destination
● IP Blacklist/Reputation – Set to Permit or Deny. When set to Deny, Wanguard Filter blocks all blacklisted IP addresses immediately after activation. The required filtering rules are applied by the Netfilter firewall for traffic forwarded to/from the attacked destination
The [IP Blacklist Options] button next to it lets you select lists of IP addresses with a bad reputation. Blacklisted addresses are matched against the source address of IPv4 traffic. This option should only be used for a relatively small number of blacklisted IPs, as it can affect firewall performance and the routing/forwarding process. The maximum number of blacklisted IP addresses is 524,288. The IP Blacklist Options window contains:
▪ Update Frequency – How often the enabled data sources are re-downloaded, from Every Minute to Every Month. Select Never to stop refreshing them altogether▪ Blacklist Data Sources – A grid listing each source with its Enabled state, Description, URL, the number of IPs found in it, and the moment it was Updated On (never, until the first successful download). Click [Add Data Source] to define additional sources by Description and URL, or use [Modify Data Source] and [Delete Data Source] to manage existing ones; double-clicking a row opens it for editing as well. A new source is enabled the moment it is added, deleting one asks for confirmation, and [Add Data Source] and [Delete Data Source] require the Administrator role. Ticking or unticking Enabled is written immediately, without waiting for [Save]. Wanguard ships with eleven well-known sources, all of them disabled▪ Blacklisted IPs – The list of blacklisted IP addresses aggregated from all enabled data sources, one per line, de-duplicated and sorted. Every IPv4 address found in a downloaded source is extracted, so plain-text lists, CSV files and RSS feeds are all usable, but IPv6 addresses are skipped and a CIDR prefix contributes only its network address. You can edit the list by hand; the next scheduled update rebuilds it from the data sources and overwrites your changes
● Packet Rate-limiting – You can use this parameter to limit the rate of packets per time unit to a predefined value or, when the value entered ends with the character %, to a percentage of the anomaly threshold. The time unit is chosen in the drop-down next to the field: /second, /minute, /hour, or /day. The value also accepts the K, M, and G multipliers
● Packet Rate-limit Hash – You can apply the packet rate-limiting globally to a single object (Src. IP, Src. Port, Dst. IP, or Dst. Port) or any combination of objects. If the rate-limiting should be connection-oriented, select all objects. To rate-limit the packet rate of each source IP, select the Src. IP object
● Byte Rate-limiting – You can use this parameter to limit the rate of bytes per time unit to a predefined value or, when the value ends with the character %, to a percentage of the anomaly threshold. It offers the same time units and multipliers as the packet rate-limit
● Byte Rate-limit Hash – You can apply the byte rate-limiting globally to a single object (Src. IP, Src. Port, Dst. IP, or Dst. Port) or any combination of objects. If the rate-limiting should be connection-oriented, select all objects. To rate-limit the byte rate of each source IP, select the Src. IP object
11.2. Filtering Rules
The Filtering Rules grid shows the filtering rule criteria available for the selected decoder, and permits the editing of the associated parameters. Criteria that cannot apply to the decoder are left out — a TCP decoder is not offered the UDP port criteria — and the payload (DPI) criteria appear only on the tab of the decoder they inspect, such as Packet Payload on IP or TCP Payload on TCP.
Two further columns, DPI Offset Start and DPI Offset Stop, are hidden by default. Reveal them from the column header menu to set the payload byte range, between 0 and 1514, that the payload (DPI) criteria inspect.