21. Components » BGP Connector
Wanguard sends and withdraws BGP advertisements (or routing updates) in these scenarios:
The following backends handle communication with BGP-enabled routers:
To add a BGP Connector, click the [+] button in the title bar of the Configuration » Components panel. To modify an existing BGP Connector, go to Configuration » Components and click its name.
21.1. GoBGP Connector
Before you add a GoBGP Connector, ensure you have a fully functional GoBGP installation. If not, see the GoBGP installation section. You can run a single GoBGP instance along with multiple GoBGP Connectors, which is handy for sending announcements with different parameters (such as multiple communities).
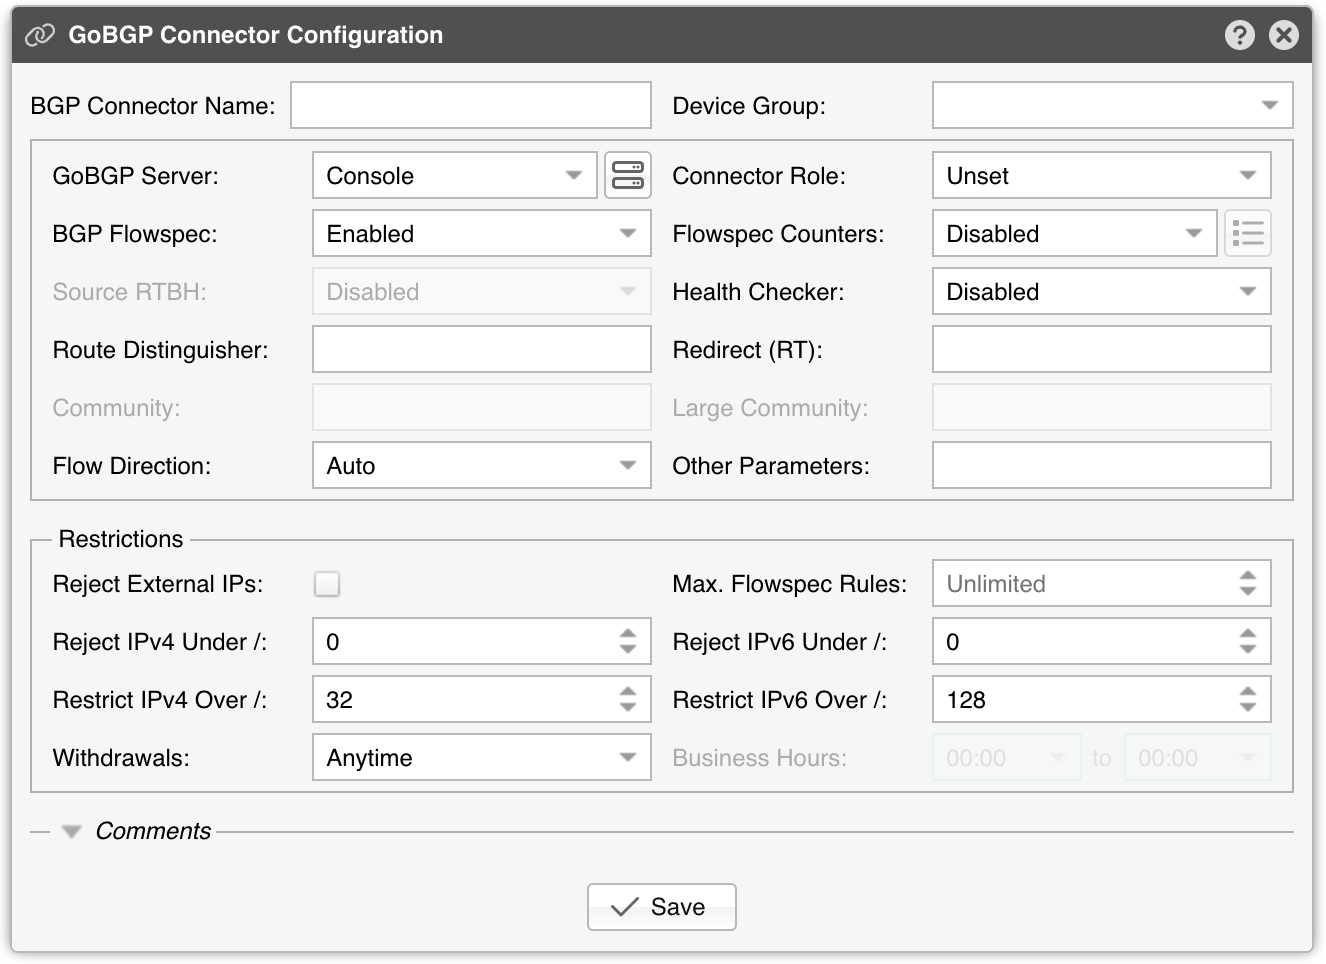
GoBGP Connector Configuration parameters:
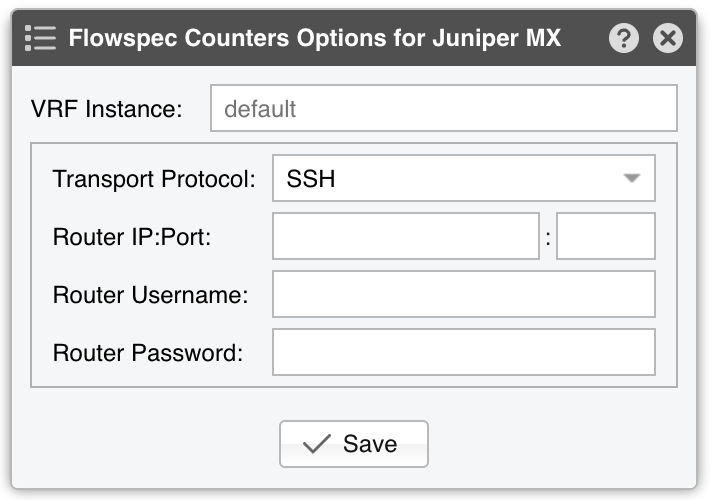
● BGP Connector Name – A short label or description for the GoBGP Connector● Device Group – (Optional) A label for organizing connectors, such as by location or characteristics, or to permit role-based access. The combo box is editable, so you can type a new group instead of selecting an existing one● GoBGP Server – Choose the server on which GoBGP is running. The button on the right opens the configuration of that server● Connector Role – The role determines which Actions are shown in the New Flowspec Rule window and which announcements take priority when different BGP Connectors have overlapping announcements. This avoids mitigation announcements being overwritten by diversion announcements▪ Unset – No role is assigned. A new Connector starts with this value▪ Mitigation – Choose if this Connector handles null-routing or traffic filtering▪ Diversion – Choose if this Connector manages traffic diversion● BGP Flowspec – Set it to Enabled if the router supports BGP Flowspec; a new GoBGP Connector starts with it enabled. If Flowspec is unsupported, consider using a Quagga Connector for standard route announcements. The field is grayed out while Source RTBH is Enabled on a Connector whose role is not Diversion● Flowspec Counters – Because no vendor-neutral standard exists for reporting packet/byte drops in Flowspec, functionality is limited to two options. The field is grayed out while BGP Flowspec is Disabled:▪ Disabled – The counters matched by Flowspec rules are not visible in Wanguard▪ Juniper MX – Wanguard connects to a Juniper MX router and periodically runs the command “show firewall filter __flowspec_default_inet__”, parsing the output to match counters to known rules. Click the options button on the right-hand side to open Flowspec Counters Options for Juniper MX:• VRF Instance – (Optional) The routing instance to query when the Flowspec rules are installed inside a VRF. Leave it empty to query the default instance• Transport Protocol – Connect to the router over SSH or gRPC• Router IP:Port – The management IP address and port of the router• Router Username and Router Password – The credentials used to authenticate on the router. The address, the username and the password are all mandatory once Flowspec Counters is set to Juniper MX● Source RTBH – Enable this option if the BGP Connector handles Source RTBH (not to be confused with the more common Destination RTBH). Very few networks support this feature. It is mutually exclusive with BGP Flowspec, and it is grayed out on a Connector whose role is Diversion● Health Checker – When Enabled, the BGP peers’ status is checked every minute. If a peer goes down, Wanguard logs a warning in the event log. You can view the peers’ status in Reports » Devices » Overview● Route Distinguisher – (Optional) An ‘rd’ value included with each announcement● Redirect (RT) – (Optional) Parameter for diversion towards an RT (route target)● Community – (Optional) BGP community or list of communities appended to each announcement. It is grayed out while BGP Flowspec is Enabled● Large Community – (Optional) BGP large community or list of large communities appended to each announcement. It is grayed out while BGP Flowspec is Enabled● Flow Direction – Swaps the source and destination IPs in each announcement. Leave it on Auto, or set it to Inverted only in symmetric routing scenarios. It is available only while BGP Flowspec is Enabled● Other Parameters – Additional parameters passed with each announcement in gobgp format. It is grayed out when BGP Flowspec is Enabled on a Diversion Connector
The Restrictions section limits what the GoBGP Connector is allowed to announce. Setting Source RTBH to Enabled grays out Reject External IPs and the four prefix limits.
● Reject External IPs – When checked, it permits only announcements for the prefixes defined in an IP Zone● Max. Flowspec Rules – Because routers have a limited capacity for Flowspec rules, enter your router’s max limit here to avoid overflowing its Flowspec table. Leave it empty for Unlimited. Known limits published by vendors: Nokia (Alcatel-Lucent) 512, Cisco (ASR9k) 3000, Juniper 8000● Reject IPv4 Under / – Restricts sending IPv4 prefixes whose CIDR mask is less than the configured value, between 0 and 32. For example, 32 allows only host prefixes, blocking any subnets. Enter 0 to disable this feature● Reject IPv6 Under / – Restricts sending IPv6 prefixes whose CIDR mask is less than the configured value, between 0 and 128. For example, 128 rejects any prefix that isn’t a host, blocking manual/automatic subnet announcements. Enter 0 to disable this feature● Restrict IPv4 Over / – Specifies the maximum IPv4 CIDR mask your DDoS mitigation providers will accept, between 1 and 32. For example, if your peers only allow /24, set this to 24. Enter 32 to disable the feature (permit host routes)● Restrict IPv6 Over / – Specifies the maximum IPv6 CIDR mask your DDoS mitigation providers will accept, between 1 and 128. For example, if your peers allow up to /48, set it to 48. Enter 128 to disable the feature (permit host routes)● Withdrawals – Leave it on Anytime to withdraw announcements as soon as they are no longer needed, or choose After business hours to postpone every withdrawal until the interval defined in Business Hours● Business Hours – Two selectors set the start and the end of that interval, on the hour. They stay grayed out while Withdrawals is Anytime, and the Console refuses to save two identical values
A collapsed Comments section at the bottom stores notes about the GoBGP Connector; they are internal-only and won’t appear anywhere else. [Save] writes the configuration, and [Delete] — shown only after the Connector has been saved once — removes it after asking for confirmation. A BGP Connector that a Filter component or a Response action still refers to cannot be deleted; the Console names what uses it.
To enable the GoBGP Connector, click the on/off switch next to its name in the Configuration » Components panel.
Once you enable the GoBGP Connector, Wanguard Sensor and Wanguard Filter can use it when triggered by a Response. For automatic Flowspec-based attack mitigation, configure Wanguard Filter and add the “Announce a BGP routing update with Flowspec or S/RTBH” action in the “When a filtering rule is detected” panel of the Response.
Flowspec announcements can be issued by Console users via Reports » Tools » Routing » [Add Flowspec Rule], or via the REST API from any scripting language.
All BGP routing updates are logged in Reports » Tools » Routing » BGP Announcement Archive. If you encounter errors, check the BGP Connector Troubleshooting steps.
21.1.1. GoBGP Installation
Wanguard uses the GoBGP Connector to communicate with gobgpd (as described above). Detailed configuration of gobgp.conf is beyond this documentation’s scope. Refer to the Network Integration Guideline for insights on different deployment scenarios and router configurations.
Installation steps differ by Linux distribution:
Install and enable GoBGP from your Linux distribution’s repository:
[root@localhost ~]# apt install gobgpd
Create the config file in /etc/gobgpd.conf.
Example for a Flowspec-enabled router:
[global.config]
        as = 65001
        router-id = "192.168.1.1"

[[neighbors]]
        [neighbors.config]
                neighbor-address = "192.168.1.2"
                peer-as = 65001

        [[neighbors.afi-safis]]
                [neighbors.afi-safis.config]
                        afi-safi-name = "ipv4-flowspec"
        [[neighbors.afi-safis]]
                [neighbors.afi-safis.config]
                        afi-safi-name = "ipv6-flowspec"
        [[neighbors.afi-safis]]
                [neighbors.afi-safis.config]
                        afi-safi-name = "ipv4-unicast"
        [[neighbors.afi-safis]]
               [neighbors.afi-safis.config]
                        afi-safi-name = "ipv6-unicast"
Start and check the gobgpd service:
[root@localhost ~]# systemctl enable gobgpd
[root@localhost ~]# systemctl start gobgpd
[root@localhost ~]# systemctl status gobgpd
To check the status of the neighbors:
[root@localhost ~]# gobgp nei
To see the announced Flowspec routes for IPv4:
[root@localhost ~]# gobgp global rib -a ipv4-flowspec
On RHEL, Rocky or AlmaLinux, download and install the gobgp binary from https://github.com/osrg/gobgp
21.2. ExaBGP Connector
Before creating an ExaBGP Connector, ensure you have a fully functional exabgpd configuration. If not, see the ExaBGP installation section. You can run one exabgp instance along with multiple ExaBGP Connectors, which is helpful for sending announcements with varying parameters (e.g., different BGP communities).
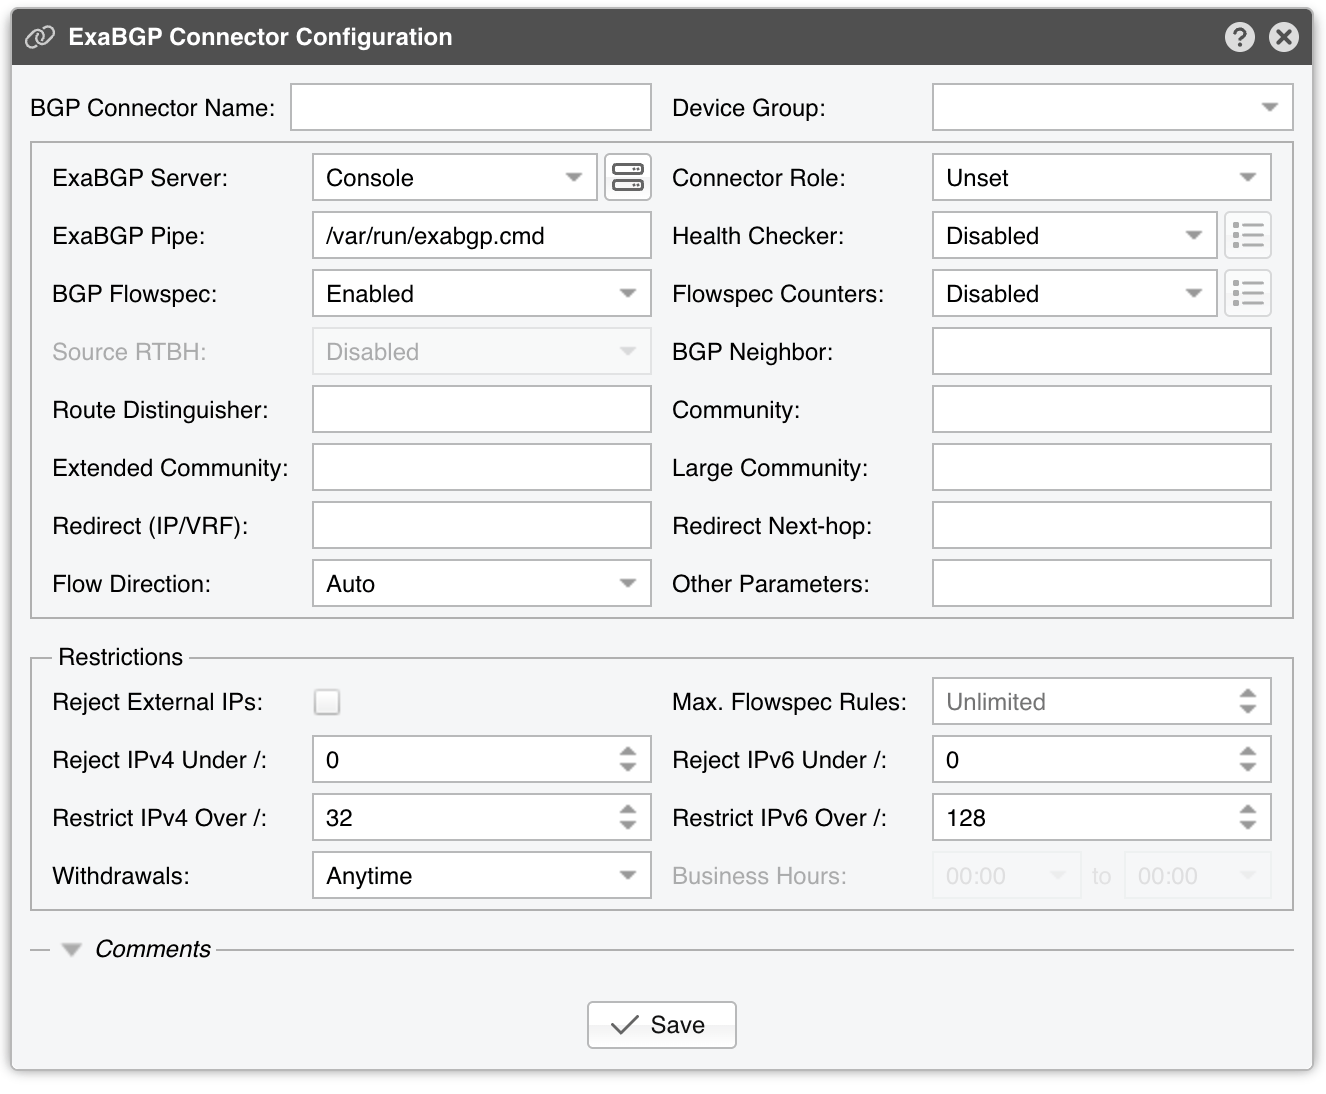
ExaBGP Connector Configuration parameters:
● BGP Connector Name – A short label or description for the ExaBGP Connector● Device Group – (Optional) A label for organizing connectors, such as by location or characteristics, or to permit role-based access. The combo box is editable, so you can type a new group instead of selecting an existing one● ExaBGP Server – Choose the server on which ExaBGP is running. The button on the right opens the configuration of that server● Connector Role – The role determines which Actions are shown in the New Flowspec Rule window and which announcements take priority when different BGP Connectors have overlapping announcements. This avoids mitigation announcements being overwritten by diversion announcements▪ Unset – No role is assigned. A new Connector starts with this value▪ Mitigation – Choose if this Connector handles null-routing or traffic filtering▪ Diversion – Choose if this Connector manages traffic diversion● ExaBGP Pipe – Specifies the path to the pipe file controlling ExaBGP. This file must be writable by theandrisoftsystem account. It is mandatory, and a new Connector suggests /var/run/exabgp.cmd● Health Checker – When Enabled, the existence of the ExaBGP Pipe file is checked every minute. If the file doesn’t exist, a warning is written in the event log. The status of the BGP peers is checked too, and when a BGP peer is down, another warning is written in the event log. You can view the status of the BGP peers in Reports » Devices » Overview. This functionality needs a working “exabgpcli show neighbor summary” command, executed by theandrisoftuser. If the binary is not in the default location, set the Path to exabgpcli in the Health Checker Options window opened by the button on the right, which stays grayed out while the Health Checker is Disabled● BGP Flowspec – Set it to Enabled if the router supports BGP Flowspec; a new ExaBGP Connector starts with it enabled. If the router doesn’t support Flowspec, consider using a Quagga Connector instead. The field is grayed out while Source RTBH is Enabled on a Connector whose role is not Diversion● Flowspec Counters – Because no vendor-neutral standard exists for reporting packet/byte drops in Flowspec, functionality is limited to two options. The field is grayed out while BGP Flowspec is Disabled:▪ Disabled – The counters matched by Flowspec rules are not visible in Wanguard▪ Juniper MX – Wanguard connects to a Juniper MX router and periodically runs the command “show firewall filter __flowspec_default_inet__”, parsing the output to match counters to known rules. Click the options button on the right-hand side to open Flowspec Counters Options for Juniper MX:• VRF Instance – (Optional) The routing instance to query when the Flowspec rules are installed inside a VRF. Leave it empty to query the default instance• Transport Protocol – Connect to the router over SSH or gRPC• Router IP:Port – The management IP address and port of the router• Router Username and Router Password – The credentials used to authenticate on the router. The address, the username and the password are all mandatory once Flowspec Counters is set to Juniper MX● Source RTBH – Enable this option if the BGP Connector handles Source RTBH (not to be confused with the more common Destination RTBH). Very few networks support this feature. It is mutually exclusive with BGP Flowspec, and it is grayed out on a Connector whose role is Diversion● BGP Neighbor – (Optional) The BGP neighbor to which the BGP Connector’s announcements are applied● Route Distinguisher – (Optional) An ‘rd’ value included with each announcement● Community – (Optional) BGP community or list of communities appended to each announcement● Extended Community – (Optional) BGP extended community or list of extended communities appended to each announcement● Large Community – (Optional) BGP large community or list of large communities appended to each announcement● Redirect (IP/VRF) – (Optional) Parameter for diversion; can be an IP, an IPv4 and an IPv6 address separated by “;”, a VRF, or “self”● Redirect Next-hop – (Optional) Diverts the traffic matched by Flowspec rules to the specified next-hop IP, using redirect-to-IP announcements as defined in draft-ietf-idr-flowspec-redirect-ip-02● Flow Direction – Swaps the source and destination IPs in each announcement. Leave it on Auto, or set it to Inverted only in symmetric routing scenarios. It is available only while BGP Flowspec is Enabled● Other Parameters – Additional parameters passed with each announcement in exabgp format, such as local-preference or as-path
The Restrictions section limits what the ExaBGP Connector is allowed to announce. Setting Source RTBH to Enabled grays out Reject External IPs and the four prefix limits.
● Reject External IPs – When checked, it permits only announcements for the prefixes defined in an IP Zone● Max. Flowspec Rules – Because routers have a limited capacity for Flowspec rules, enter your router’s max limit here to avoid overflowing its Flowspec table. Leave it empty for Unlimited. Known limits published by vendors: Nokia (Alcatel-Lucent) 512, Cisco (ASR9k) 3000, Juniper 8000● Reject IPv4 Under / – Restricts sending IPv4 prefixes whose CIDR mask is less than the configured value, between 0 and 32. For example, 32 allows only host prefixes, blocking any subnets. Enter 0 to disable this feature● Reject IPv6 Under / – Restricts sending IPv6 prefixes whose CIDR mask is less than the configured value, between 0 and 128. For example, 128 rejects any prefix that isn’t a host, blocking manual/automatic subnet announcements. Enter 0 to disable this feature● Restrict IPv4 Over / – Specifies the maximum IPv4 CIDR mask your DDoS mitigation providers will accept, between 1 and 32. For example, if your peers only allow /24, set this to 24. Enter 32 to disable the feature (permit host routes)● Restrict IPv6 Over / – Specifies the maximum IPv6 CIDR mask your DDoS mitigation providers will accept, between 1 and 128. For example, if your peers allow up to /48, set it to 48. Enter 128 to disable the feature (permit host routes)● Withdrawals – Leave it on Anytime to withdraw announcements as soon as they are no longer needed, or choose After business hours to postpone every withdrawal until the interval defined in Business Hours● Business Hours – Two selectors set the start and the end of that interval, on the hour. They stay grayed out while Withdrawals is Anytime, and the Console refuses to save two identical values
A collapsed Comments section at the bottom stores notes about the ExaBGP Connector; they are internal-only and won’t appear anywhere else. [Save] writes the configuration, and [Delete] — shown only after the Connector has been saved once — removes it after asking for confirmation. A BGP Connector that a Filter component or a Response action still refers to cannot be deleted; the Console names what uses it.
To enable the ExaBGP Connector, click the on/off switch next to its name in the Configuration » Components panel.
Once you enable the ExaBGP Connector, Wanguard Sensor and Wanguard Filter can use it when triggered by a Response. For automatic Flowspec-based attack mitigation, configure Wanguard Filter and add the “Announce a BGP routing update with Flowspec or S/RTBH” action in the “When a filtering rule is detected” panel of the Response.
Flowspec announcements can be issued by Console users via Reports » Tools » Routing » [Add Flowspec Rule], or via the REST API from any scripting language.
All BGP routing updates are logged in Reports » Tools » Routing » BGP Announcement Archive. If you encounter errors, check the BGP Connector Troubleshooting steps.
21.2.1. ExaBGP Installation
Wanguard uses the ExaBGP Connector to communicate with exabgpd (as described above). Detailed configuration of exabgp.conf is beyond this document’s scope; see the Network Integration Guideline for deployment scenarios and router configuration requirements.
The installation process varies according to the Linux distribution and ExaBGP version:
Install and enable ExaBGP from the package repository:
[root@localhost ~]# apt install exabgp
[root@localhost ~]# systemctl enable exabgp
Create the exabgp config file in /etc/exabgp/exabgp.conf. Example:
neighbor 10.0.0.2 {
  router-id 10.0.0.1;
  local-address 10.0.0.1;
  local-as 65000;
  peer-as 65000;
}
Start and check the exabgp service:
[root@localhost ~]# systemctl start exabgp
[root@localhost ~]# systemctl status exabgp
Enter /run/exabgp/exabgp.in in the ExaBGP Pipe field of the ExaBGP Connector.
Download and extract ExaBGP 4.2 from GitHub to /opt/exabgp:
[root@localhost ~]# wget https://github.com/Exa-Networks/exabgp/archive/refs/heads/4.2.zip
[root@localhost ~]# mv 4.2.zip /opt
[root@localhost ~]# cd /opt
[root@localhost opt]# unzip 4.2.zip
[root@localhost opt]# mv exabgp-4.2 exabgp
Create the file /lib/systemd/system/exabgp.service and add the content:
[Unit]
Description=ExaBGP
Documentation=man:exabgp(1)
Documentation=man:exabgp.conf(5)
Documentation=https://github.com/Exa-Networks/exabgp/wiki
After=network.target
ConditionPathExists=/etc/exabgp/exabgp.conf

[Service]
Environment=exabgp_daemon_daemonize=false
RuntimeDirectory=exabgp
ExecStartPre=/bin/bash -c "/usr/bin/mkfifo -m 0666 /run/exabgp/exabgp.{in,out}"
ExecStopPost=/bin/bash -c "/bin/rm -f /run/exabgp/exabgp.{in,out}"
ExecStart=/opt/exabgp/sbin/exabgp /etc/exabgp/exabgp.conf
ExecReload=/bin/kill -USR1 $MAINPID

[Install]
WantedBy=multi-user.target
Create the exabgp config file in /etc/exabgp/exabgp.conf. Example:
neighbor 10.0.0.2 {
  router-id 10.0.0.1;
  local-address 10.0.0.1;
  local-as 65000;
  peer-as 65000;
}
Start and check the exabgp service:
[root@localhost ~]# systemctl daemon-reload
[root@localhost ~]# systemctl enable exabgp
[root@localhost ~]# systemctl start exabgp
[root@localhost ~]# systemctl status exabgp
Enter /run/exabgp/exabgp.in in the ExaBGP Pipe field of the ExaBGP Connector.
Install ExaBGP from the package repository:
[root@localhost ~]# apt install exabgp
Create the exabgp config file in /etc/exabgp/exabgp.conf. Example:
neighbor 10.0.0.2 {
  router-id 10.0.0.1;
  local-address 10.0.0.1;
  local-as 65000;
  peer-as 65000;
}
Edit the file /lib/systemd/system/exabgp.service:
Enable:
User=exabgp
Group=exabgp

Add:
ExecStopPost=/bin/bash -c "/bin/rm -f /run/exabgp/exabgp.{in,out}"

Replace:
ExecStartPre=chmod 600 /run/exabgp/exabgp.in
ExecStartPre=chmod 600 /run/exabgp/exabgp.out
With:
ExecStartPre=chmod 777 /run/exabgp/exabgp.in
ExecStartPre=chmod 777 /run/exabgp/exabgp.out
Start and check the exabgp service:
[root@localhost ~]# systemctl daemon-reload
[root@localhost ~]# systemctl enable exabgp
[root@localhost ~]# systemctl start exabgp
[root@localhost ~]# systemctl status exabgp
Enter /run/exabgp/exabgp.in in the ExaBGP Pipe field of the ExaBGP Connector.
21.3. Quagga Connector
Before creating a Quagga Connector, ensure you have a fully functional bgpd configuration. If not, see the Quagga / FRR installation section. You can run one bgpd instance along with multiple Quagga Connectors, which is helpful for sending announcements with varying parameters (e.g., different BGP communities, different route-maps).
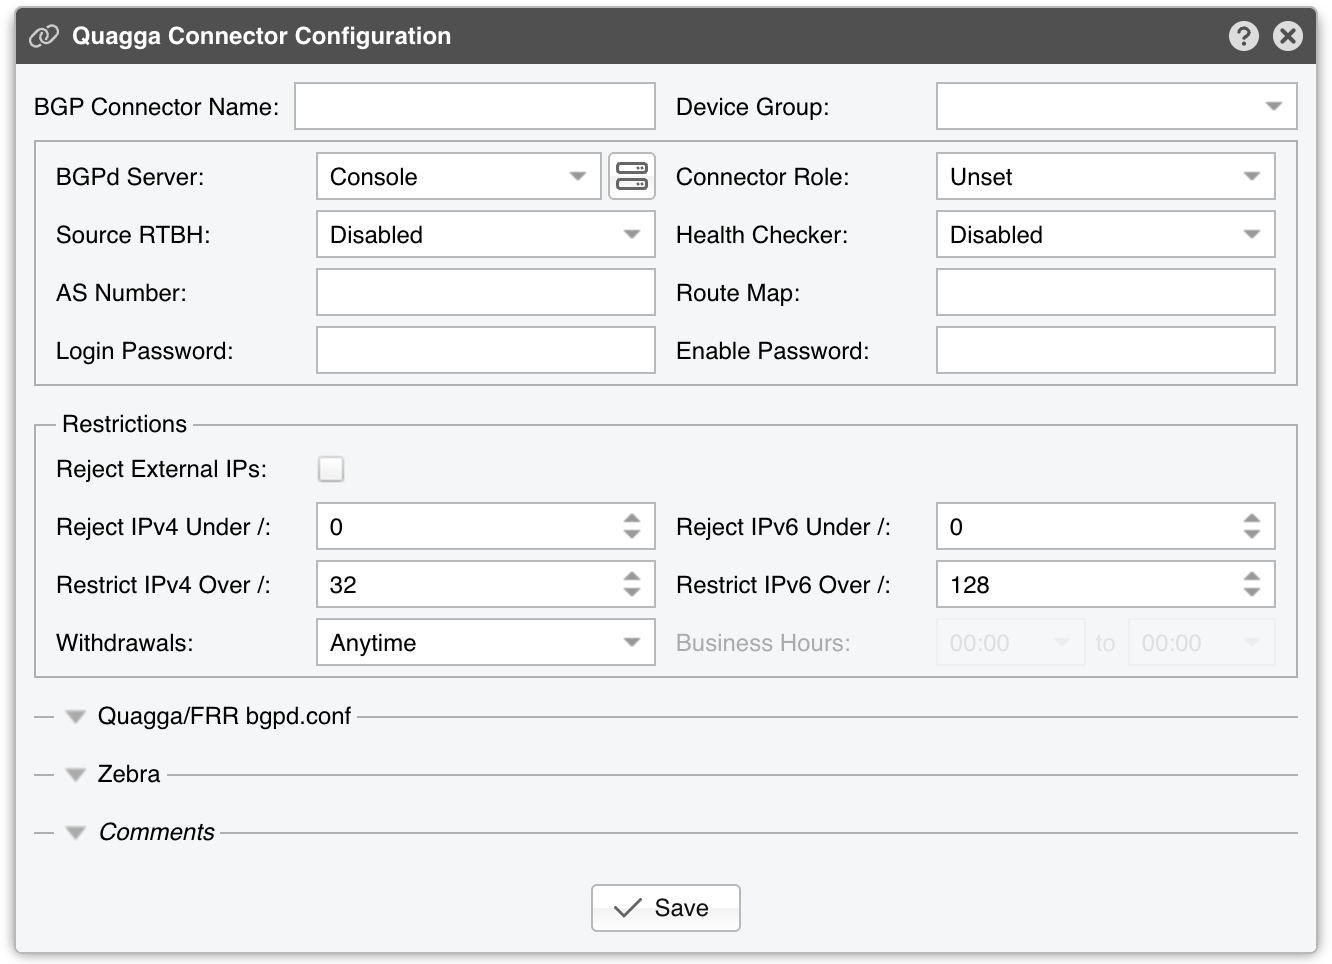
Quagga Connector Configuration parameters:
● BGP Connector Name – A short label or description for the Quagga Connector● Device Group – (Optional) A label for organizing connectors, such as by location or characteristics, or to permit role-based access. The combo box is editable, so you can type a new group instead of selecting an existing one● BGPd Server – Choose the server on which Quagga bgpd or FRR bgpd is running. The button on the right opens the configuration of that server● Connector Role – The role determines which Actions are shown in the New Flowspec Rule window and which announcements take priority when different BGP Connectors have overlapping announcements. This avoids mitigation announcements being overwritten by diversion announcements▪ Unset – No role is assigned. A new Connector starts with this value▪ Mitigation – Choose if this Connector handles null-routing or traffic filtering▪ Diversion – Choose if this Connector manages traffic diversion● Source RTBH – Enable this option if the BGP Connector handles Source RTBH (not to be confused with the more common Destination RTBH). Very few networks support this feature. It is grayed out on a Connector whose role is Diversion● Health Checker – When Enabled, the BGP peers’ status is checked every minute. If a peer goes down, Wanguard logs a warning in the event log. You can view the peers’ status in Reports » Devices » Overview● AS Number – Enter the same AS number used in the bgpd configuration● Route Map – (Optional) A route-map that will be used for each announcement. This option is not mandatory but widely used to append communities to the routing update. If you need to use multiple route maps, define multiple Quagga Connectors, one for each route map● Login Password – Password needed to connect to the bgpd daemon● Enable Password – Configuration mode password of the bgpd daemon
The Restrictions section limits what the Quagga Connector is allowed to announce. Setting Source RTBH to Enabled grays out Reject External IPs and the four prefix limits.
● Reject External IPs – When checked, it permits only announcements for the prefixes defined in an IP Zone● Reject IPv4 Under / – Restricts sending IPv4 prefixes whose CIDR mask is less than the configured value, between 0 and 32. For example, 32 allows only host prefixes, blocking any subnets. Enter 0 to disable this feature● Reject IPv6 Under / – Restricts sending IPv6 prefixes whose CIDR mask is less than the configured value, between 0 and 128. For example, 128 rejects any prefix that isn’t a host, blocking manual/automatic subnet announcements. Enter 0 to disable this feature● Restrict IPv4 Over / – Specifies the maximum IPv4 CIDR mask your DDoS mitigation providers will accept, between 1 and 32. For example, if your peers only allow /24, set this to 24. Enter 32 to disable the feature (permit host routes)● Restrict IPv6 Over / – Specifies the maximum IPv6 CIDR mask your DDoS mitigation providers will accept, between 1 and 128. For example, if your peers allow up to /48, set it to 48. Enter 128 to disable the feature (permit host routes)● Withdrawals – Leave it on Anytime to withdraw announcements as soon as they are no longer needed, or choose After business hours to postpone every withdrawal until the interval defined in Business Hours● Business Hours – Two selectors set the start and the end of that interval, on the hour. They stay grayed out while Withdrawals is Anytime, and the Console refuses to save two identical values
Below the Restrictions sit two collapsed sections:
● Quagga/FRR bgpd.conf – The content of the bgpd.conf file can be viewed and changed from the CLI or the user interface. [View bgpd.conf] fetches the latest version of the file from the server, [Overwrite bgpd.conf] uploads what the editor holds, and [Restart bgpd] restarts the service; all three require the Administrator or Operator role. The file’s location is determined by the Linux Distribution parameter in Configuration » Servers. If you replaced the default daemon that came with the distribution, edit the file and restart bgpd only from the CLI. The bgpd.conf file uses a format very similar to the Cisco IOS configuration format. Quagga’s documentation covers the configuration options● Zebra – Tick Local Blackhole if you need the local blackhole feature provided by the Zebra daemon. This rarely-used feature is useful only for inline servers. The Login Password and Enable Password below it are the credentials required to connect to the zebra daemon, and they stay grayed out until the checkbox is ticked
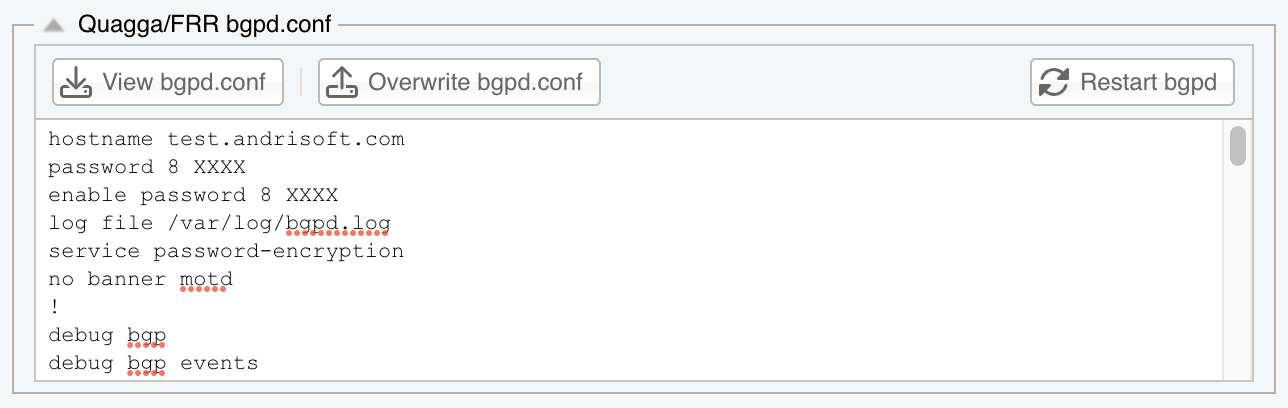
A collapsed Comments section at the bottom stores notes about the Quagga Connector; they are internal-only and won’t appear anywhere else. [Save] writes the configuration, and [Delete] — shown only after the Connector has been saved once — removes it after asking for confirmation. A BGP Connector that a Filter component or a Response action still refers to cannot be deleted; the Console names what uses it.
To enable the Quagga Connector, click the on/off switch next to its name in the Configuration » Components panel.
After the Quagga Connector is enabled, it can be used by Wanguard Sensor when a Response activates it.
Wanguard Console users can send blackhole or diversion announcements via the Quagga Connector in Reports » Tools » Routing » [Create Blackhole] or [Divert Traffic]. Console users can also use the REST API to send BGP announcements from any scripting language.
21.3.1. Quagga / FRR Installation
Wanguard sends and withdraws BGP announcements via the bgpd daemon provided by Quagga or FRR. The installation instructions are distribution-specific:
Install FRR, then edit /etc/frr/daemons. Change bgpd=no to bgpd=yes and remove the string “-A 127.0.0.1” from the bgpd_options line.
[root@localhost ~]# apt install frr      # Ubuntu
[root@localhost ~]# dnf install frr      # RHEL
[root@localhost ~]# nano /etc/frr/daemons
To be able to start the bgpd service, create a basic configuration file. Setting a password for the bgpd daemon is usually enough to get it started. Replace “bgppass” with your own password.
[root@localhost ~]# echo 'password bgppass' > /etc/frr/bgpd.conf
[root@localhost ~]# echo 'enable password bgppass' >> /etc/frr/bgpd.conf
[root@localhost ~]# chown frr /etc/frr/bgpd.conf
[root@localhost ~]# mv /etc/frr/frr.conf /etc/frr/frr.conf_bak
[root@localhost ~]# systemctl enable frr
[root@localhost ~]# systemctl restart frr
Connect to the bgpd daemon with telnet on localhost port 2605 (default bgpd port) and enter the previously-defined password (“bgppass”) when requested.
[root@localhost ~]# telnet 127.0.0.1 2605
localhost> enable
localhost# config terminal
localhost(config)#
Configure bgpd using the commands shown in the following example after adapting them to your own network. Please note that you can use the prefix-list, route-map, or distribute-list method for filtering outgoing routing information. To have a uniform approach, the following example uses route-maps. Optionally, BGP authentication can be configured to increase security and avoid any illegal BGP announcement which may lead to a security breach.
localhost(config)# router bgp <Wanguard-Filter-AS-number>
localhost(config-router)# bgp router-id <Wanguard-Filter-IP-address>
localhost(config-router)# neighbor <Router-IP-address> remote-as <Router-AS-number>
localhost(config-router)# neighbor <Router-IP-address> description <description>
localhost(config-router)# neighbor <Router-IP-address> password <BGP MD5 password>
localhost(config-router)# neighbor <Router-IP-address> route-map Wanguard-Filter-in in
localhost(config-router)# neighbor <Router-IP-address> route-map Wanguard-Filter-out out
localhost(config-router)# no bgp network import-check
localhost(config-router)# exit
localhost(config)# route-map Wanguard-Filter-in deny 10
localhost(config-route-map)# exit
localhost(config)# route-map Wanguard-Filter-out permit 10
localhost(config-route-map)# set community no-advertise <Wanguard-Filter-community>
localhost(config-route-map)# exit
localhost(config)# write
localhost(config)# exit
To display the bgpd configuration, enter the show running-config command from the “enable” command level. In the following example, the router’s AS number is 1000, and the BGPd AS number is 65000.
The following partial sample output is displayed:
localhost# show running-config
... skipped ...
router bgp 65000
bgp router-id 192.168.1.100
no bgp network import-check
neighbor 192.168.1.1 remote-as 1000
neighbor 192.168.1.1 description divert-from router
neighbor 192.168.1.1 soft-reconfiguration inbound
neighbor 192.168.1.1 route-map Wanguard-Filter-in in
neighbor 192.168.1.1 route-map Wanguard-Filter-out out
!
route-map Wanguard-Filter-in deny 10
!
route-map Wanguard-Filter-out permit 10
set community no-advertise
!
line vty
... skipped ...
Install FRR, then edit /etc/frr/daemons. Change bgpd=no to bgpd=yes and remove the string “-A 127.0.0.1” from the bgpd_options line.
[root@localhost ~]# apt install frr
[root@localhost ~]# nano /etc/frr/daemons
To be able to start the bgpd service, create a basic configuration file. Setting a password for the bgpd daemon is usually enough to get it started. Replace “bgppass” with your own password.
[root@localhost ~]# echo 'password bgppass' > /etc/frr/bgpd.conf
[root@localhost ~]# echo 'enable password bgppass' >> /etc/frr/bgpd.conf
[root@localhost ~]# chown frr /etc/frr/bgpd.conf
[root@localhost ~]# ln -s /etc/frr/bgpd.conf /etc/frr/frr.conf
[root@localhost ~]# systemctl enable frr
[root@localhost ~]# systemctl restart frr
Connect to the bgpd daemon with telnet on localhost port 2605 (default bgpd port) and enter the previously-defined password (“bgppass”) when requested.
[root@localhost ~]# telnet 127.0.0.1 2605
localhost> enable
localhost# config terminal
localhost(config)#
Configure bgpd using the commands shown in the following example after adapting them to your own network. Please note that you can use the prefix-list, route-map, or distribute-list method for filtering outgoing routing information. To have a uniform approach, the following example uses route-maps. Optionally, BGP authentication can be configured to increase security and avoid any illegal BGP announcement which may lead to a security breach.
localhost(config)# router bgp <Wanguard-Filter-AS-number>
localhost(config-router)# bgp router-id <Wanguard-Filter-IP-address>
localhost(config-router)# neighbor <Router-IP-address> remote-as <Router-AS-number>
localhost(config-router)# neighbor <Router-IP-address> description <description>
localhost(config-router)# neighbor <Router-IP-address> password <BGP MD5 password>
localhost(config-router)# neighbor <Router-IP-address> route-map Wanguard-Filter-in in
localhost(config-router)# neighbor <Router-IP-address> route-map Wanguard-Filter-out out
localhost(config-router)# no bgp network import-check
localhost(config-router)# exit
localhost(config)# route-map Wanguard-Filter-in deny 10
localhost(config-route-map)# exit
localhost(config)# route-map Wanguard-Filter-out permit 10
localhost(config-route-map)# set community no-advertise <Wanguard-Filter-community>
localhost(config-route-map)# exit
localhost(config)# write
localhost(config)# exit
To display the bgpd configuration, enter the show running-config command from the “enable” command level. In the following example, the router’s AS number is 1000, and the BGPd AS number is 65000.
The following partial sample output is displayed:
localhost# show running-config
... skipped ...
router bgp 65000
bgp router-id 192.168.1.100
no bgp network import-check
neighbor 192.168.1.1 remote-as 1000
neighbor 192.168.1.1 description divert-from router
neighbor 192.168.1.1 soft-reconfiguration inbound
neighbor 192.168.1.1 route-map Wanguard-Filter-in in
neighbor 192.168.1.1 route-map Wanguard-Filter-out out
!
route-map Wanguard-Filter-in deny 10
!
route-map Wanguard-Filter-out permit 10
set community no-advertise
!
line vty
... skipped ...
Install Quagga, then remove the loopback binding (-A 127.0.0.1) from the /lib/systemd/system/bgpd.service file.
[root@localhost ~]# apt install quagga
[root@localhost ~]# nano /lib/systemd/system/bgpd.service
[root@localhost ~]# systemctl daemon-reload
To be able to start the bgpd service, create a basic configuration file. Setting a password for the bgpd daemon is usually enough to get it started. Replace “bgppass” with your own password. On these systems, bgpd starts only when zebra is running.
[root@localhost ~]# echo 'password bgppass' > /etc/quagga/bgpd.conf
[root@localhost ~]# echo 'enable password bgppass' >> /etc/quagga/bgpd.conf
[root@localhost ~]# chown quagga /etc/quagga/bgpd.conf
[root@localhost ~]# touch /etc/quagga/zebra.conf
[root@localhost ~]# systemctl start zebra
[root@localhost ~]# systemctl enable zebra
[root@localhost ~]# systemctl start bgpd
[root@localhost ~]# systemctl enable bgpd
Connect to the bgpd daemon with telnet on localhost port 2605 (default bgpd port) and enter the previously-defined password (“bgppass”) when requested.
[root@localhost ~]# telnet 127.0.0.1 2605
localhost> enable
localhost# config terminal
localhost(config)#
Configure bgpd using the commands shown in the following example after adapting them to your own network. Please note that you can use the prefix-list, route-map, or distribute-list method for filtering outgoing routing information. To have a uniform approach, the following example uses route-maps. Optionally, BGP authentication can be configured to increase security and avoid any illegal BGP announcement which may lead to a security breach.
localhost(config)# router bgp <Wanguard-Filter-AS-number>
localhost(config-router)# bgp router-id <Wanguard-Filter-IP-address>
localhost(config-router)# neighbor <Router-IP-address> remote-as <Router-AS-number>
localhost(config-router)# neighbor <Router-IP-address> description <description>
localhost(config-router)# neighbor <Router-IP-address> password <BGP MD5 password>
localhost(config-router)# neighbor <Router-IP-address> route-map Wanguard-Filter-in in
localhost(config-router)# neighbor <Router-IP-address> route-map Wanguard-Filter-out out
localhost(config-router)# exit
localhost(config)# route-map Wanguard-Filter-in deny 10
localhost(config-route-map)# exit
localhost(config)# route-map Wanguard-Filter-out permit 10
localhost(config-route-map)# set community no-advertise <Wanguard-Filter-community>
localhost(config-route-map)# exit
localhost(config)# write
localhost(config)# exit
To display the bgpd configuration, enter the show running-config command from the “enable” command level. In the following example, the router’s AS number is 1000, and the BGPd AS number is 65000.
The following partial sample output is displayed:
localhost# show running-config
... skipped ...
router bgp 65000
bgp router-id 192.168.1.100
neighbor 192.168.1.1 remote-as 1000
neighbor 192.168.1.1 description divert-from router
neighbor 192.168.1.1 soft-reconfiguration inbound
neighbor 192.168.1.1 route-map Wanguard-Filter-in in
neighbor 192.168.1.1 route-map Wanguard-Filter-out out
!
route-map Wanguard-Filter-in deny 10
!
route-map Wanguard-Filter-out permit 10
set community no-advertise
!
line vty
... skipped ...
21.3.2. IPv4 and IPv6 in Quagga / FRR
The bgpd.conf excerpt below shows an example of IPv4 and IPv6 RTBH (Remotely Triggered Black Hole). Two communities are used. Community 65000:666 is the regular RTBH community. Community 65000:667 marks the prefixes of our own infrastructure, so that we never blackhole ourselves: routes carrying it are not installed in the RIB and are only sent to the upstreams.
router bgp 65002
 bgp router-id 198.51.100.220
 no bgp default ipv4-unicast
 neighbor 198.51.100.77 remote-as 65000
 neighbor 198.51.100.77 description RouteReflector1
 neighbor 198.51.100.77 ebgp-multihop 10
 neighbor 198.51.100.77 activate
 neighbor 198.51.100.77 route-map RM-DENY in
 neighbor 198.51.100.77 route-map RM-IPV4-ADVERTISE-NULL out
 neighbor 198.51.100.88 remote-as 65000
 neighbor 198.51.100.88 description RouteReflector2
 neighbor 198.51.100.88 ebgp-multihop 10
 neighbor 198.51.100.88 activate
 neighbor 198.51.100.88 route-map RM-DENY in
 neighbor 198.51.100.88 route-map RM-IPV4-ADVERTISE-NULL out
 neighbor 2001:DB8::77 remote-as 65000
 neighbor 2001:DB8::77 description RouteReflector1
 neighbor 2001:DB8::77 ebgp-multihop 10
 neighbor 2001:DB8::77 override-capability
 neighbor 2001:DB8::88 remote-as 65000
 neighbor 2001:DB8::88 description RouteReflector2
 neighbor 2001:DB8::88 ebgp-multihop 10
!
 address-family ipv6
 neighbor 2001:DB8::77 activate
 neighbor 2001:DB8::77 soft-reconfiguration inbound
 neighbor 2001:DB8::77 route-map RM-DENY in
 neighbor 2001:DB8::77 route-map RM-IPV6-ADVERTISE-NULL out
 neighbor 2001:DB8::88 activate
 neighbor 2001:DB8::88 soft-reconfiguration inbound
 neighbor 2001:DB8::88 route-map RM-DENY in
 neighbor 2001:DB8::88 route-map RM-IPV6-ADVERTISE-NULL out
 exit-address-family
!
ip prefix-list PL-IPV4-ANY-AUTOMATIC-RTBH seq 5 permit 0.0.0.0/0 ge 32
ip prefix-list PL-IPV4-INFRA-AUTOMATIC-RTBH seq 5 permit 198.51.100.0/24 le 32
!
ipv6 prefix-list PL-IPV6-ANY-AUTOMATIC-RTBH seq 5 permit ::/0 ge 128
ipv6 prefix-list PL-IPV6-INFRA-AUTOMATIC-RTBH seq 5 permit 2001:DB8::/64 le 128
!
route-map RM-DENY deny 10
!
route-map RM-IPV4-ADVERTISE-NULL permit 10
 match ip address prefix-list PL-IPV4-INFRA-AUTOMATIC-RTBH
 set community 65000:667
 set ip next-hop 198.51.100.220
!
route-map RM-IPV4-ADVERTISE-NULL permit 20
 match ip address prefix-list PL-IPV4-ANY-AUTOMATIC-RTBH
 set community 65000:666
 set ip next-hop 198.51.100.220
!
route-map RM-IPV6-ADVERTISE-NULL permit 10
 match ipv6 address prefix-list PL-IPV6-INFRA-AUTOMATIC-RTBH
 set community 65000:667
 set ipv6 next-hop global 2001:DB8::220
!
route-map RM-IPV6-ADVERTISE-NULL permit 20
 match ipv6 address prefix-list PL-IPV6-ANY-AUTOMATIC-RTBH
 set community 65000:666
 set ipv6 next-hop global 2001:DB8::220
!
Debug commands (2001:DB8::666 and 198.51.100.66 are null-routed):
quagga# show vers
Quagga 0.99.24.1 ().


quagga# sh ipv6 bgp summary
BGP router identifier 198.51.100.220, local AS number 65002
RIB entries 1, using 112 bytes of memory
Peers 4, using 18 KiB of memory

Neighbor        V         AS MsgRcvd MsgSent   TblVer  InQ OutQ Up/Down  State/PfxRcd
2001:DB8::77    4 65000   18675   18683        0    0    0 01:08:19        0
2001:DB8::88    4 65000   18675   18691        0    0    0 00:23:48        0

Total number of neighbors 2

quagga# sh ipv6 bgp neighbors 2001:DB8::88 advertised-routes

   Network          Next Hop            Metric LocPrf Weight Path
*> 2001:DB8::666/128
                    2001:DB8::220
                                            0         32768 i

quagga# sh ip bgp summary
BGP router identifier 198.51.100.220, local AS number 65002
RIB entries 3, using 336 bytes of memory
Peers 4, using 18 KiB of memory

Neighbor        V         AS MsgRcvd MsgSent   TblVer  InQ OutQ Up/Down  State/PfxRcd
198.51.100.77   4 65000   18672   18681        0    0    0 01w5d23h        0
198.51.100.88   4 65000   18671   18681        0    0    0 01w5d23h        0


quagga# sh ip bgp nei 198.51.100.88 advertised-routes

   Network          Next Hop            Metric LocPrf Weight Path
*> 198.51.100.66/32
                    198.51.100.220           0         32768 i