13. Network & Policy » IP Zone
IP Zones are hierarchical, tree-like data structures that define your network boundaries and contain per-subnet settings. You must add every prefix in your network — IPs, subnets, or entire blocks — to the IP Zones listed under Configuration » Network & Policy!
To add a new IP Zone, go to Configuration » Network & Policy » [+] and select [IP Zone]. You only need more than one IP Zone if you want to use different per-subnet settings for different Sensors. If this is the case, it may be easier to open an existing IP Zone that already includes your IP address ranges, and duplicate it by pressing the [Batch] menu and then by selecting [Duplicate IP Zone].
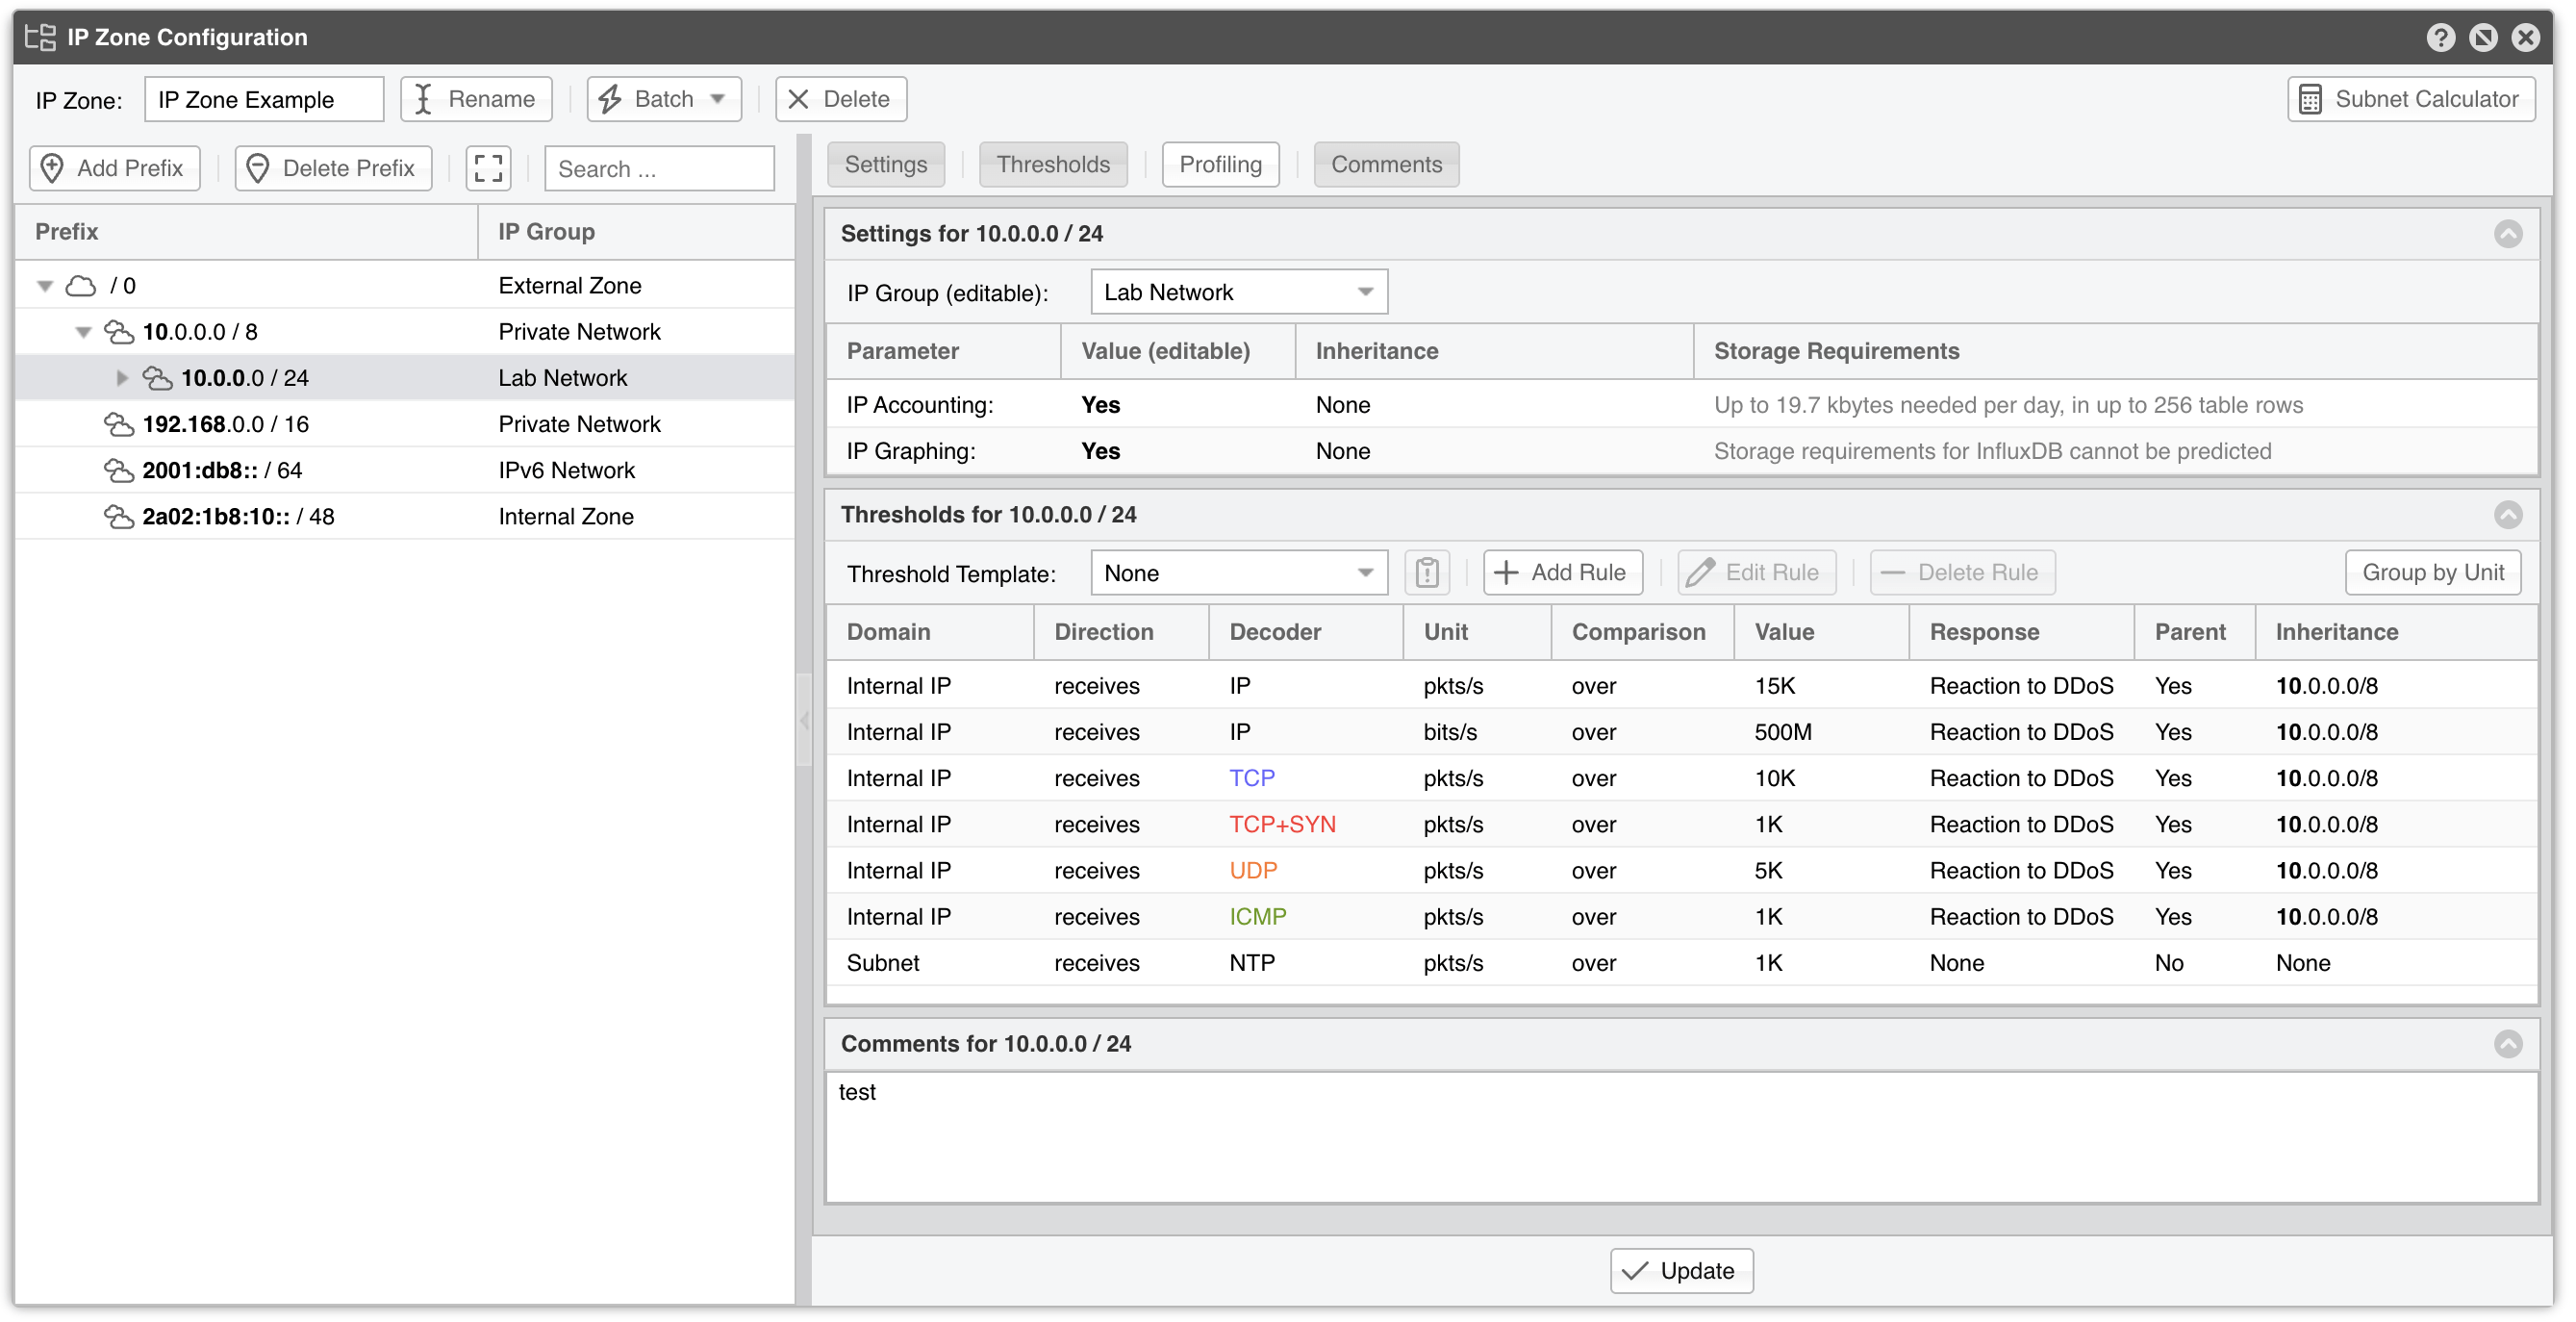
The IP Zone Configuration window is split into two vertical sections. The left section contains the prefix tree, while the right section provides detailed settings for the selected prefix. Whenever you add a new prefix, the tree on the left updates automatically.
The top bar carries the name of the IP Zone next to the [Rename] button, the [Batch] menu, and [Delete], which removes the whole IP Zone. On the right-hand side, [Subnet Calculator] opens the calculator without leaving the window. The [Batch] menu gathers the actions that work on many prefixes, or on the IP Zone as a whole:
▪ [Add List of Prefixes] – Insert several prefixes at once, all sharing the same Settings for New Prefixes▪ [Import Prefixes from BGP] – Insert the prefixes currently announced in BGP for an ASN or AS-SET. [Test] previews the resulting list before you commit to it, and Aggregate Prefixes, ticked by default, merges the prefixes that can be summarized▪ [Restore from File] – Open the Backup File Importer & Tester and insert the prefixes of a backup file exported from another IP Zone. Conflict Policy decides whether a prefix that already exists is left alone (Ignore existing data) or replaced (Overwrite existing data)▪ [Duplicate IP Zone] – Create an exact copy of the IP Zone▪ [Backup to File] – Write the IP Zone into a file that can be imported into another IP Zone or Console. Content selects what the backup carries: the prefixes, their data, and the templates they refer to▪ [Export as CSV File] – Output the content into a CSV format that can be parsed by scripts or imported into Excel▪ [Show as HTML Table] – View the configuration of every prefix in a single window
The prefix tree lists the Prefix and its IP Group, and its own toolbar provides [Add Prefix], [Delete Prefix], a button that expands or collapses the whole tree, and a search box that filters by prefix or IP Group. Right-clicking a prefix offers the same [Add Prefix] and [Delete Prefix], along with [Split Prefix] (which breaks a subnet into the smaller blocks of an Apply Mask you choose), [Subnet Calculator], and [Open Prefix] (which opens the traffic reports of that prefix). When entering IP addresses or IP blocks, use the CIDR notation. To enter individual hosts, use the /32 CIDR mask for IPv4 and /128 for IPv6.
Another way to add prefixes is to use the REST API.
Every IP Zone contains the network /0, which translates to 0.0.0.0/0 for IPv4 and to ::/0 for IPv6. Because the CIDR mask is /0, this “supernet” includes all IP addresses available for IPv4 and IPv6. It cannot be deleted. For easier configuration, every new prefix that you define inherits by default the properties of the most specific IP class that includes it (the one having the biggest CIDR mask).
The right-hand section is a stack of panels — Settings, Thresholds, Profiling, and Comments — each of which can be shown or hidden with the button of the same name in the toolbar above them, and collapsed by clicking its title. The Thresholds and Profiling panels are titled after the prefix you selected, and Profiling is present only when the profiling engine is installed. The [Update] button at the bottom saves every panel at once.
The Settings panel is a grid with a Parameter column and an editable Value column. Double-click a value to change it: besides Yes and No, each parameter also accepts Inherit, which takes the value of the closest enclosing prefix. The IP Group selector sits in the panel’s toolbar and offers Inherit as well.
● IP Group – You can enter a short description of the selected prefix, such as the name of the customer it is allocated to. When you set the same value on multiple prefixes, you will be able to generate aggregated traffic reports. This combo box is editable, so you can enter a different value than the existing ones● IP Graphing – Set to Yes to permit graph data collection for every IP contained in the selected prefix. IP Graphing is automatically enabled for subnets (not individual hosts) that are explicitly defined within the IP Zone. Do not enable this option on many/large subnets when not needed or without a performance impact assessment. The IP Sweep Graphing option from General Settings » Graphs & Storage can be used to prevent generating graph data for IPs that only receive traffic without sending traffic in return● IP Accounting – Set to Yes to permit the collection of daily accounting data for each IP contained in the selected prefix. IP Accounting is always enabled for the subnets explicitly defined in the IP Zone. Do not enable this option on many/large subnets when not needed or without a performance impact assessmentThe Inheritance column shows whether a prefix’s settings were inherited from a broader prefix or defined locally.The Storage Requirements column indicates the disk space needed by each Packet Sensor and Flow Sensor interface to store the generated data. It is recalculated as soon as you change IP Graphing or IP Accounting, without waiting for [Update]. Enabling IP Graphing and IP Accounting for very large prefixes (e.g., 0.0.0.0/0) might generate data that could overload the Console server and quickly fill up the disk space. The storage requirements for IP graph data can be estimated only when using RRDTool. For InfluxDB it is impossible to determine the necessary disk space for storing graph data over extended periods of time.
The Profiling panel contains user-created profiling rules, which trigger anomalies when the traffic of the prefix deviates from its learned baseline. It behaves like the Thresholds panel: [Add Rule], [Edit Rule], and [Delete Rule] manage the list, and they are disabled while a Profiling Template is selected. The Network & Policy » Profiling Template chapter explains every metric of a profiling rule. You can add profiling rules to the selected prefix if the Profiling Template selector is set to “None”. When you need to add identical profiling rules to multiple prefixes, go to Configuration » Network & Policy, click the [+] button from the title bar, and add the rules to a new Profiling Template. Then, select the new Profiling Template in each prefix.