42. Appendix 1 – DPDK Configuration
Wanguard 8.5 is compatible with DPDK 24.11 running on Ubuntu 18+, Debian 10+, and Rocky/AlmaLinux 8+. The code is currently optimized for the Broadwell microarchitecture and runs on all Intel microarchitectures from Sandy Bridge onward (Ivy Bridge, Haswell, Broadwell, Skylake, etc.), as well as AMD Zen processors. Consult the comparison table in Choosing a Method of DDoS Mitigation for other DPDK limitations.
42.1. DPDK Installation
To use DPDK 24.11, follow the installation guide from https://www.dpdk.org and reserve at least 8 x 1GB hugepages for best performance. For reference:
Install packages required for building DPDK:
[root@localhost ~]# apt install build-essential meson ninja-build libpcap-dev libnuma-dev python3-pyelftools
If you use a Mellanox or NVIDIA network card, install the OFED driver driver first:
[root@localhost ~/MLNX_OFED_LINUX]# ./mlnxofedinstall --add-kernel-support --dpdk
Download and build the latest version of the stable DPDK 24.11 branch:
[root@localhost ~]# wget https://fast.dpdk.org/rel/dpdk-24.11.1.tar.xz
[root@localhost ~]# tar xf ./dpdk-24.11.1.tar.xz
[root@localhost ~]# cd dpdk-stable-24.11.1
[root@localhost ~/dpdk-stable-24.11.1]# meson build
[root@localhost ~/dpdk-stable-24.11.1]# ninja -C build
[root@localhost ~/dpdk-stable-24.11.1]# ninja -C build install
Configure the OS to use 1GB hugepages. Edit /etc/default/grub to pass these options to the kernel:
default_hugepagesz=1G hugepagesz=1G
Configure the number of hugepages (at least 8) allocated to DPDK /etc/sysctl.conf or /etc/sysctl.conf.d/82-andrisoft.conf:
[root@localhost ~]# echo vm.nr_hugepages=8 > /etc/sysctl.conf.d/82-andrisoft.conf
[root@localhost ~]# service procps force-reload
Update grub and create a mount point:
[root@localhost ~]# update-grub
[root@localhost ~]# mkdir /mnt/huge
[root@localhost ~]# mount -t hugetlbfs pagesize=1GB /mnt/huge
To make this mount permanent, add the following line to /etc/fstab:
nodev /mnt/huge hugetlbfs pagesize=1GB 0 0
Reboot and verify the hugepage configuration and driver status:
[root@localhost ~]# cat /proc/meminfo | grep Huge
[root@localhost ~]# ~/dpdk-stable-24.11.1/usertools/dpdk-hugepages.py --show
[root@localhost ~]# ~/dpdk-stable-24.11.1/usertools/dpdk-devbind.py --status
Mellanox or NVIDIA NICs don’t require special binding for DPDK, but other NICs do:
[root@localhost ~]# modprobe vfio-pci
[root@localhost ~]# ~/dpdk-stable-24.11.1/usertools/dpdk-devbind.py -b vfio-pci <pci_id> #replace <pci_id> with the number shown in the first column from the --status output
Finally, check port status via dpdk-testpmd, to confirm that DPDK recognizes and manages the interfaces:
[root@localhost ~]# dpdk-testpmd -c 0xff -- -i
testpmd> show port info all
Install packages required for building DPDK:
[root@localhost ~]# dnf groupinstall "Development Tools"
[root@localhost ~]# yum install python3 meson ninja-build python3-pyelftools numactl-devel libpcap-devel grubby
If you use a Mellanox or NVIDIA network card, install the OFED driver first:
[root@localhost ~/MLNX_OFED_LINUX]# ./mlnxofedinstall --add-kernel-support --dpdk
Download and build the latest version of the stable DPDK 24.11 branch:
[root@localhost ~]# wget https://fast.dpdk.org/rel/dpdk-24.11.1.tar.xz
[root@localhost ~]# tar xf ./dpdk-24.11.1.tar.xz
[root@localhost ~]# cd dpdk-stable-24.11.1
[root@localhost ~/dpdk-stable-24.11.1]# meson build
[root@localhost ~/dpdk-stable-24.11.1]# ninja -C build
[root@localhost ~/dpdk-stable-24.11.1]# ninja -C build install
Configure the OS to reserve 1GB hugepages, and create a new mount point:
[root@localhost ~]# grubby --args="default_hugepagesz=1G hugepagesz=1G hugepages=8" --update-kernel=ALL
[root@localhost ~]# mkdir /mnt/huge
[root@localhost ~]# mount -t hugetlbfs pagesize=1GB /mnt/huge
To make this mount permanent, add the following line to /etc/fstab:
nodev /mnt/huge hugetlbfs pagesize=1GB 0 0
Reboot and verify the hugepage configuration and driver status:
[root@localhost ~]# cat /proc/meminfo | grep Huge
[root@localhost ~]# ~/dpdk-stable-24.11.1/usertools/dpdk-hugepages.py --show
[root@localhost ~]# ~/dpdk-stable-24.11.1/usertools/dpdk-devbind.py --status
Mellanox or NVIDIA NICs don’t require special binding for DPDK, but other NICs do:
[root@localhost ~]# modprobe vfio-pci
[root@localhost ~]# ~/dpdk-stable-24.11.1/usertools/dpdk-devbind.py -b vfio-pci <pci_id> #replace <pci_id> with the number shown in the first column from the --status output
Finally, check port status via dpdk-testpmd, to confirm that DPDK recognizes and manages the interfaces:
[root@localhost ~]# dpdk-testpmd -c 0xff -- -i
testpmd> show port info all
42.2. Application Workflow
The architecture is depicted in the diagram below, illustrating a specific scenario with: 2 I/O RX lcores and 2 I/O TX lcores, handling packet I/O for 4 NIC ports (2 ports per I/O lcore), 2 Distributor lcores, and 6 Worker lcores for CPU-intensive tasks.
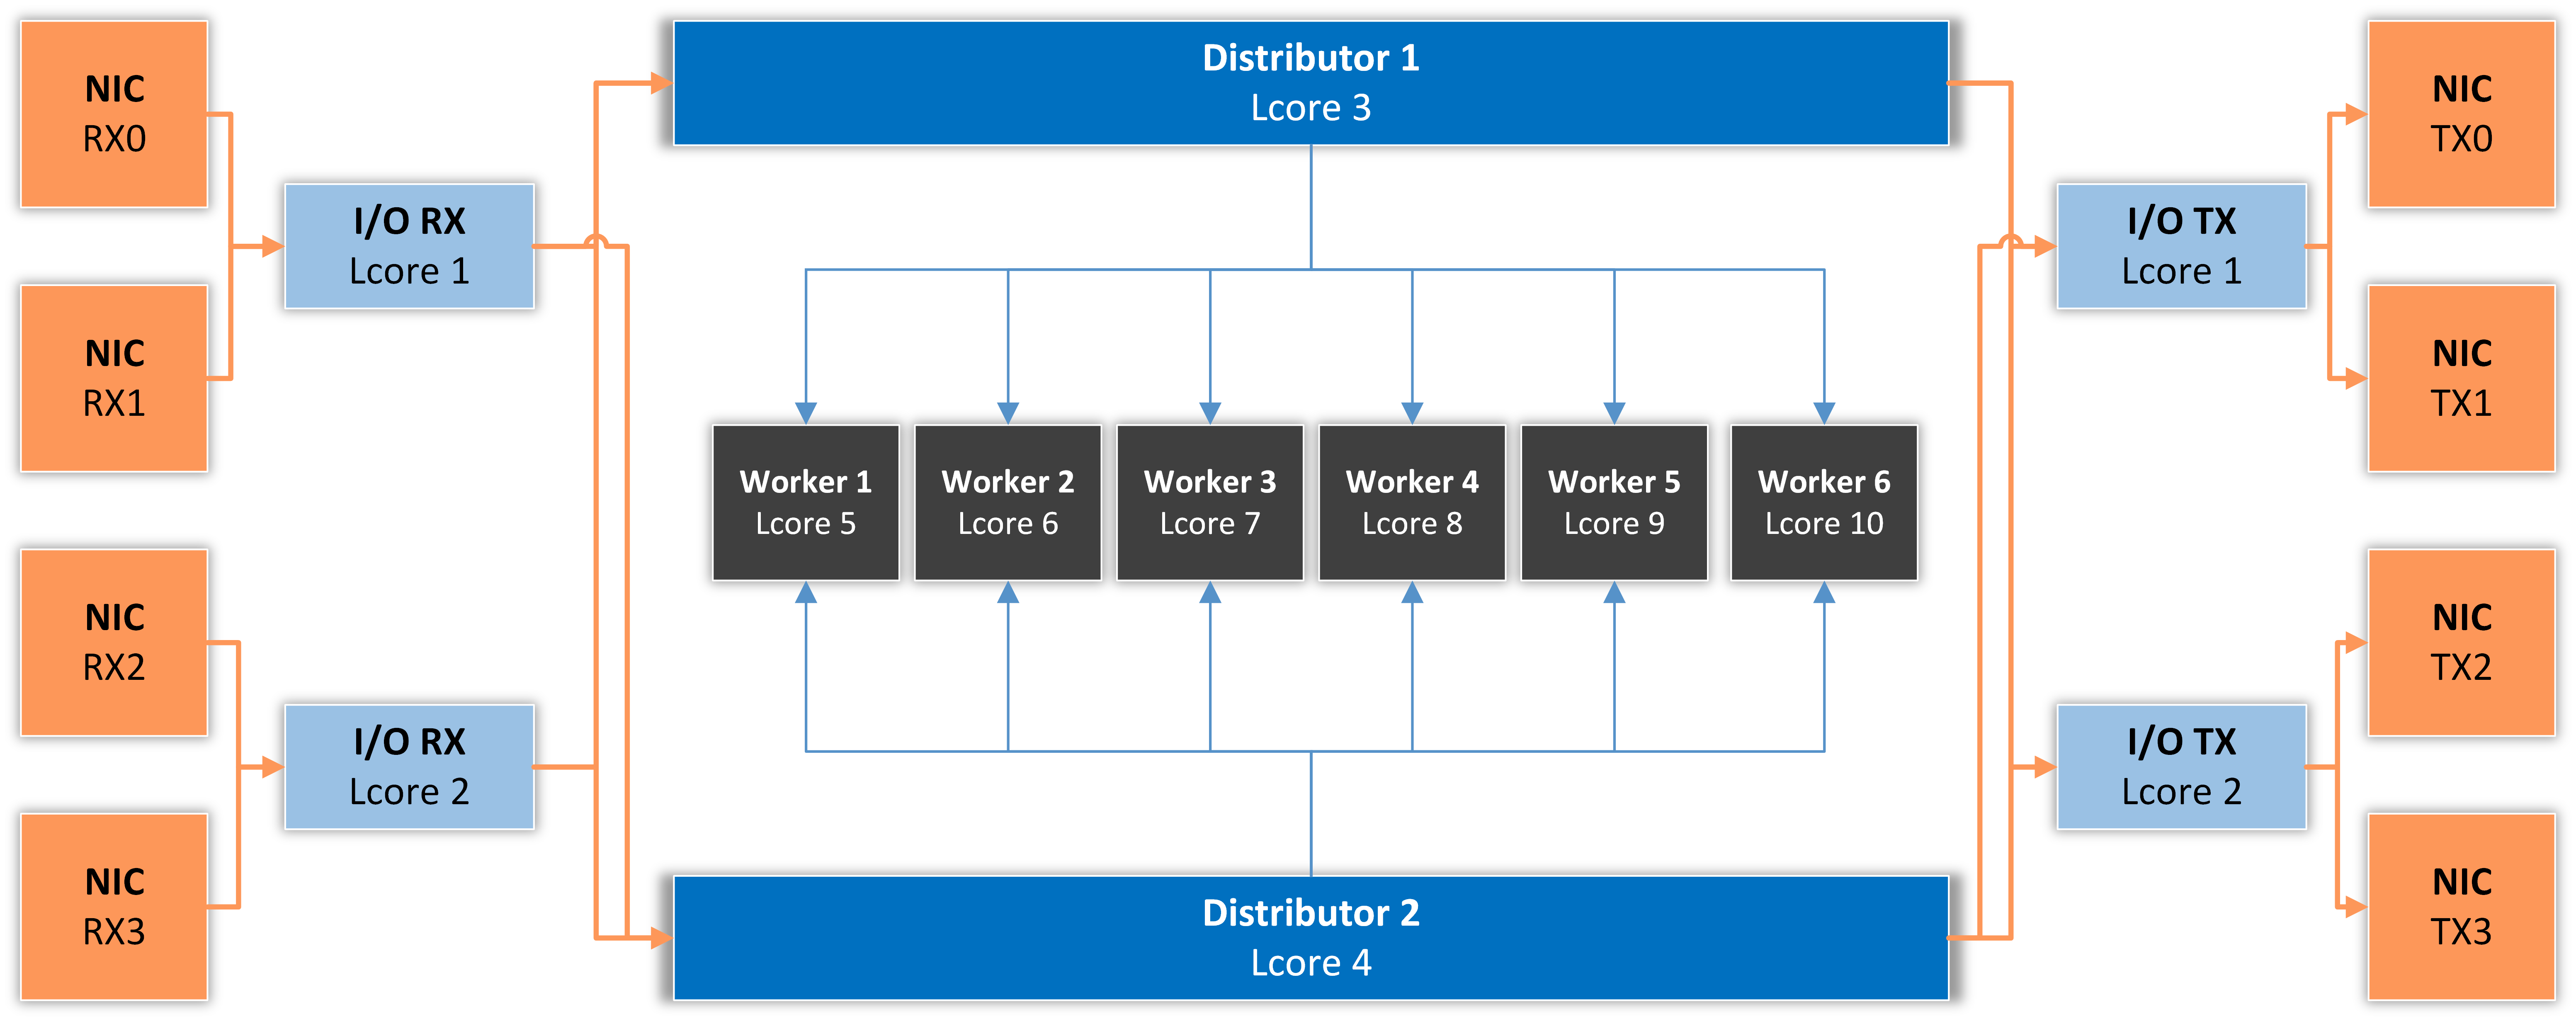
I/O RX Lcore receives packets from the assigned NIC RX ring(s) and dispatches them to one or more Distributor lcores (logical CPU cores).
Distributor Lcore reads packets from one or more I/O RX lcores, extracts packet metadata, possibly applies the Dataplane firewall functionality, then sends metadata to one or more Worker lcores.
Worker Lcore performs heavier CPU tasks like traffic analysis and attack detection.
I/O TX Lcore handles packet TX for a predefined set of NIC ports. Packets are forwarded in batches of at least 4, causing high latency (>50 ms) if only a few packets/s are forwarded. At thousands of packets/s, latency drops under 1 ms.
A single Master Lcore is used to aggregate data from the workers.
42.3. DPDK Capture Engine Options
42.4. DPDK Configuration Example
The following configuration assumes a 14-core Xeon CPU with the layout obtained from usertools/cpu_layout.py (in the DPDK source):
Core 1 [0, 14]
Core 2 [1, 15]
Core 3 [2, 16]
Core 4 [3, 17]
Core 5 [4, 18]
Core 6 [5, 19]
Core 7 [6, 20]
Core 8 [7, 21]
Core 9 [8, 22]
Core 10 [9, 23]
Core 11 [10, 24]
Core 12 [11, 25]
Core 13 [12, 26]
Core 14 [13, 27]
These core mappings guide how lcores are assigned to I/O RX, Distributor, Worker, I/O TX threads, etc. Be sure to align your actual CPU layout with the configuration.
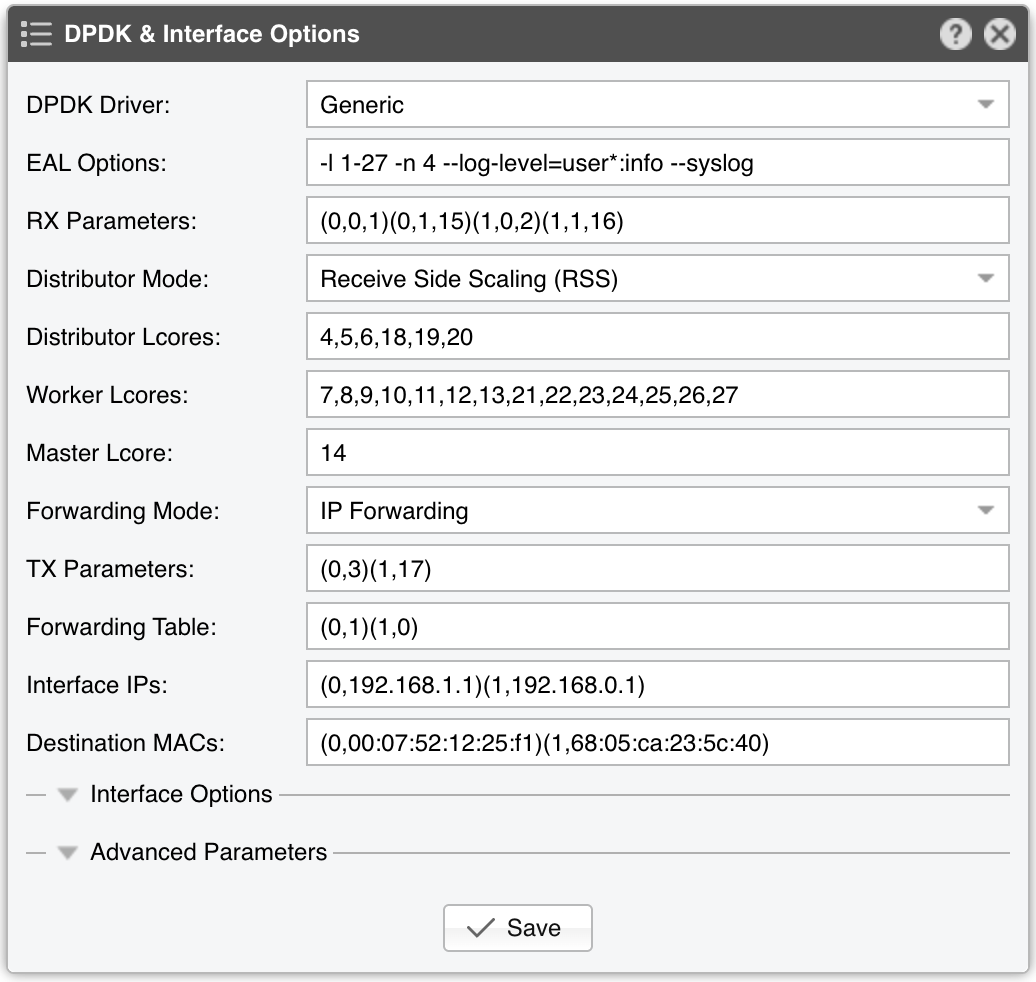
EAL Options
–l 1-27 → DPDK uses lcores 1–27 (28 lcores total, covering a 14-core CPU with Hyper-threading)
–n 4 → Uses 4 memory channels, matching the reference 14-core Broadwell CPU’s capability
––log-level=user*:info –syslog → Logs DPDK engine activity to syslog with user-level info messages
RX parameters
Configures the application to listen on interfaces 0 and 1 (DPDK-enabled), on two NIC queues (0 and 1)
Uses lcores 15 and 16 (hyper-threads of CPU cores 1 and 2) for these RX tasks
Distributor Mode
Ensures packets are forwarded in the same order they are received
Dataplane Firewall
Runs on three CPU cores: 4, 5, 6 (with hyper-threads 18, 19, and 20)
Worker Cores
Seven CPU cores: 7 through 13 (with hyper-threads 21 through 27) handle packet analysis and attack detection
Master Lcore
Lcore 14 The hyper-thread of CPU core 0, which the OS uses
DPDK’s “master” or “manager” lcore for orchestrating tasks
TX parameters
Configured to use a single CPU core for TX
Lcore 3 transmits over port 0, while lcore 17 (hyper-thread of CPU core 3) transmits over port 1
Forwarding Table
In this example, the DPDK Engine acts as an L3 pseudo-router for an out-of-line topology via BGP
Incoming packets on port 0 go to port 1, and vice versa
Interface IPs
DPDK Engine responds to ARP on port 0 with IP 192.168.1.1, and on port 1 with IP 192.168.0.1
If a router wants to route traffic to 192.168.1.1 or 192.168.0.1, DPDK Engine replies with the MAC of the correct interface
Once the router learns these MACs, it can start forwarding packets to the appropriate interface
Destination MACs
For port 0, packets are forwarded to a gateway with MAC 00:07:52:12:25:f1
For port 1, packets are forwarded to a gateway with MAC 68:05:ca:23:5c:40
Since DPDK Engine doesn’t provide a full IP stack or ARP table, the gateway MACs must be configured manually
Because there’s no true IP stack, the DPDK Engine behaves more like a forwarding bridge at Layer 3, without dynamic ARP resolution
Note
The distribution of lcores can be optimized by observing the performance-related statistics from Reports » Devices » Overview » Dataplane.